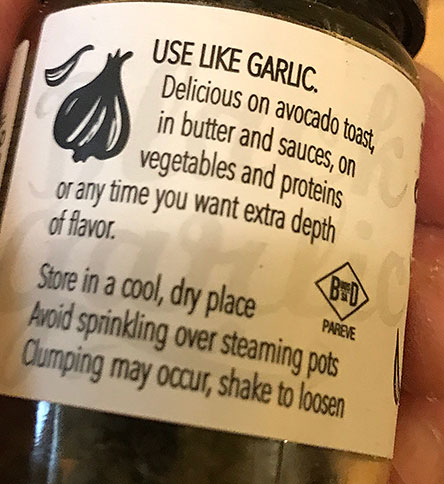
“Use like garlic. Delicious on avocado toast, in butter and sauces, on vegetables and proteins, or any time you want extra depth of flavor”
This is a pretty interesting Trader Joe’s product, a bit of an unusual find. Now a few years ago, they sold something in the produce section labeled “Black Garlic”. It was from Japan. It basically looked like a whole head of garlic you had forgotten about in the pantry that had shriveled up and turned completely black! Wild looking! I tried it. Inside shriveled shells were cloves of black garlic inside were softish and absolutely delicious, chock full of UMAMI. I found it to be a kind of amazing, and pretty unusual product for Trader Joe’s to carry. This stuff eventually vanished or was discontinued, anyway I stopped seeing it. Now a year or two later, I noticeed this small jar in the spices section. “Ground Fermented Black Garlic…Made In South Africa”. The black garlic has been dried and ground up into little tiny black bits that can be sprinkled onto things. It tastes garlicky but different from fresh garlic or garlic powder for one thing this was fermented. It’s full of Umami, adding extra depth of flavor to whatever you put it on. I did think it’s a little on the pricey side at $2.99 for a tiny 1 oz jar but I have found it does last a bit. It’s terrific added to sauces and as they mention vegetables. I am trying this on so many things. Avocado anything especially. I am thinking this is a hidden gem that many will look at and bypass and it may vanish in the future. So as we don’t know how long this product will last, if this sounds interesting, grab one to try.
Thai Jasmine Rice is wonderful, one of the tastiest kinds of rice varieties out there, alongside Indian Basmati. TJ’s has had regular Jasmine rice for a long time, and that one too is quite good. Recently however they introduced an Organic version if that interests you. The package states it’s CERTIFIED ORGANIC and “Product of Thailand”. Importantly, TJ finally has cooking directions and ratios on the package which seem correct (I have found some printed directions on rice are way off!) On this package they list using a 1:2 ratio, meaning 1 cup rice to 2 cups water and cooking the rice for 15-20 minutes. This is a good starting point for you to use. Now I rinse Jasmine rice very minimally, maybe just once instead of the standard 2-3 time as I want to preserve as much of that jasmine aroma as possible. It’s organic and as far as I can tell, quite clean, you don’t have to go overboard washing this and washing out some flavor. Washing rice these days is mostly about removing excess starch anyway, not cleaning it of debris. Make sure you drain the rice for 10 minutes too in a colander to keep your rice/water ratio on point. If you find your rice too mushy then next time reduce the water slightly. Let it sit too after cooking for 10 minutes. ORGANIC JASMINE RICE $3.49 (2 lb bag)
DIRECTIONS: Bring two cups of water to a boil in a pot with a very tight lid. Add a little salt. Add 1 cup of rinsed, drained rice. Cook 10 mins on medium heat, then reduce heat to the lowest possible heat and continue cooking for 5-8 minutes. Then turn off heat and let it sit for 5-10 minutes with the lid closed. Fluff rice and optionally add a little butter.
BTW where do you store rice? I have taken to keeping it in the fridge if there’s space – otherwise in a dark cool pantry in a zip lock bag.
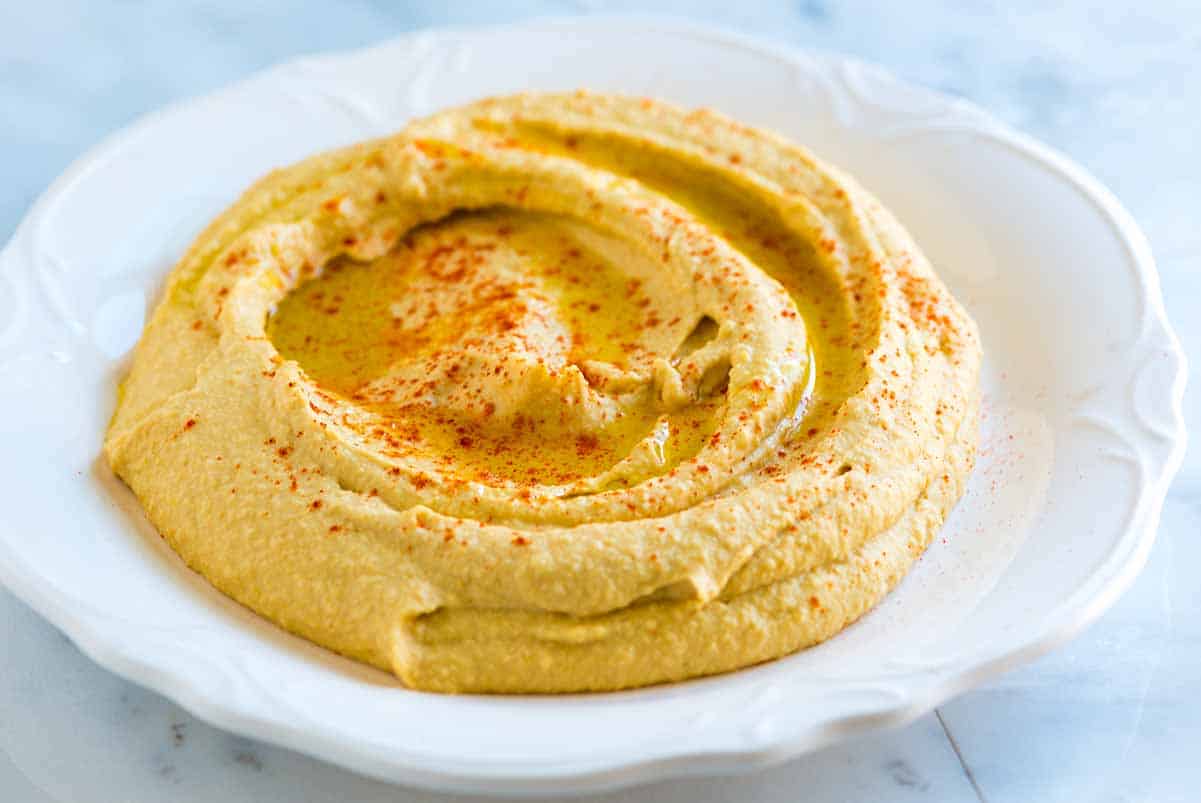
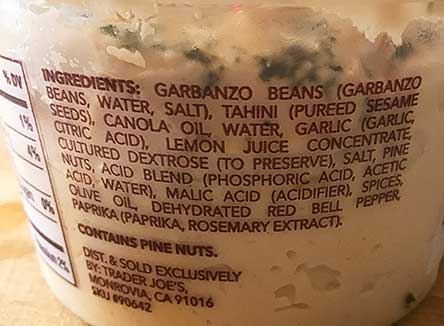
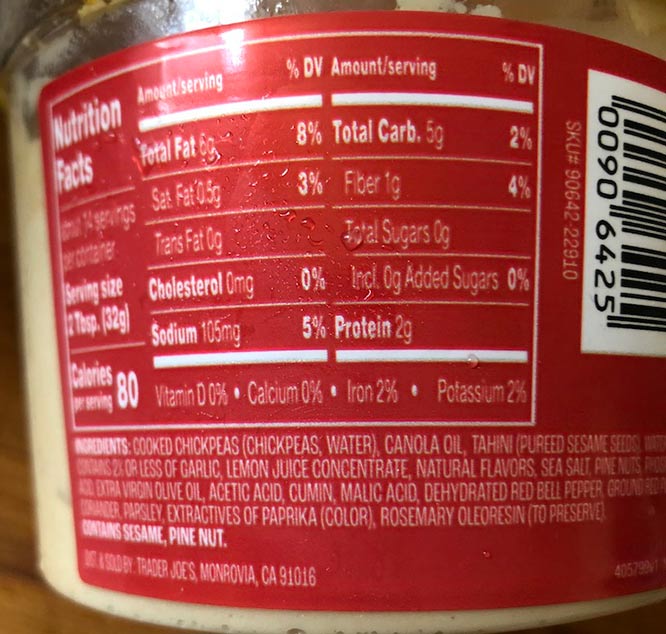
Trader Joe’s sells SO many varieties of hummus. I have gone back and forth with about three kinds there. I think this hummus is among their better ones, one reason being that this “Mediterranean Style” hummus has tahini among in the ingredients. Incredibly, at least to me, is that some versions of hummus on offer at Trader Joe’s do not have any Tahini in the ingredients. For allergy reasons perhaps for some customers?
Tahini (ground sesame paste) is an integral part of a hummus recipe and it is partly why hummus tastes good, at least to yours truly. I love hummus made with a good amount of it. I can only imagine some people don’t like tahini or its calories? Or nut allergy? That must be why TJ sells hummus both ways, with or without it? Anyway their “Mediterranean Style” hummus is tasty. It is a little fancier as on top they have a few pine nuts and spices. This is one way hummus is normally presented in most countries. A squeeze of 1/4 fresh lemon juice would be good to add IMO . To serve hummus: Put in shallow bowl and flatten out as much as possible. Run your spoon to make a circular groove all around the hummus and add a pour of your best EVOO. Sprinkle a bit of spice (Ajika for example, or ground cumin or zaatar) all around the perimeter attractively. Voila!
Serve with warm pita or naan or other flatbread.
The Mediterranean Style hummus costs about $4 for a 16 oz tub (it’s 50 cents more then the regular one with no tahini). (Update: This went up a bit but is still their most reasonable hummus and one of the only ones to come in a 16 oz container.)
BTW, you can easily make hummus (which I occasionally do) Here’s are good recipes (best results will come from cooking dried chickpeas yourself not canned ones!)
“But what makes our traditional hummus different? First, consistency. Mediterranean Hummus is super smooth and creamy, a bit more “whipped” than many of our other hummus choices. The texture of hummus tends to be different depending on where in the world it originates, so it makes sense for us to offer some of that variety in our stores. We’ve also taken the liberty of topping Trader Joe’s Mediterranean Hummus with crunchy pine nuts, and a bright blend of parsley, red bell pepper, and olive oil which creates a distinctive flavor and texture profile we think you’ll really enjoy.” – Trader Joe
UPDATE SUMMER 2025: Trader Joe’s changed this product. It’s in a new package for one thing and for another thing it seems to have changed the ingredients in that new label has tahini as third ingredient listed after canola oil. It was previously listed as second ingredient. So there is less tahini now. I have been getting the ORGANIC HUMMUS (it does cost a bit more)
Rated “While not anywhere equal to kimchi you would get at a Korean supermarket it’s OK in a pinch, especially for cooking with, and it’s pretty cheap for kimchi!”
(Review Update: I tried it again (Dec 2023). I found it improved. TJ’s kimchi has gotten a little better since I first wrote this review. While still not top notch kimchi, it’s not bad – especially factoring in the price which you can not beat)
Yogurt, kefir, sauerkraut and kimchi are all fermented foods with probiotic benefits. So in addition to being being tasty as side dish or an ingredient, kimchi is a healthy food teaming with probiotics and worth adding to your diet.
My wife is Korean/Japanese. We try to always have some kimchi in our fridge. Personally I love me some kimchi. I like it so much, during Covid I even tried my hand at making it myself (and actually it turned out great.)
From my wife and my in-laws I’ve learned to tell what’s good kimchi. My wife says Trader Joe’s is “just OK”. She will eat it if its the only kind we have in the house but she much prefers to buy kimchi at H-Mart. So lets’ get this out of the way immediately. Their kimchi is way better than Trader Joe’s. It cost more though.
I can tell you the kimchi from HMart is great. It was no doubt made locally, and trucked in which probably took no more than one or two hours. In contrast, Trader Joe’s kimchi is Made in Korea. Which sounds good but think about how is it shipped to the U.S. By Air or Sea?. I’m guessing with the time to get it to the U.S, its taken some time and fermented more which is OK for Kimchi if you want it a bit aged. It just may not be as fresh a kimchi as you might buy H-Mart (when you open a jar of that, you can tell it’s pretty new-ish as the HMart one has a a firm crunchy texture and bright color. If you check out this site, it has pictures of Kimchi over time, from one day old to fifty days old; you will really see what happens to it. Compare the “Day 50” to “Day 1” kimchi to see what occurs as it ferments more.
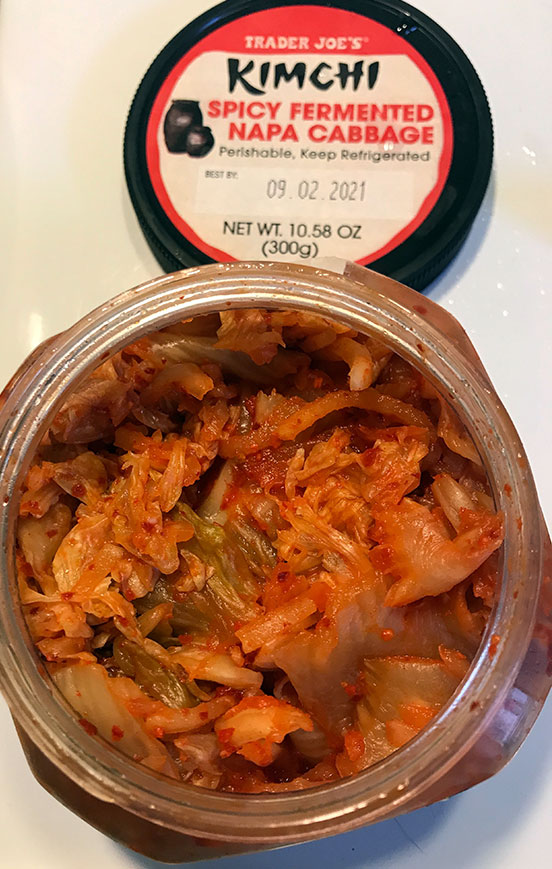
With this Trader Joe’s kimchi, the texture of the napa cabbage is a bit soft, the green quite faded.Kimchi is a “living” food that continues to ferment, even in the fridge which slows down but does not stop fermentation.
My wife and I think in a pinch a jar of Trader Joe’s kimchi is OK. As we like having some kimchi in the house we say “it’s better than no kimchi”. Generally what we do with TJ’s kimchi is use it for cooking and kind of think that’s what you should too – but of course you can just eat it as-is. Just realize this kimchi is nowhere as good as say the excellent Tobagi brand kimchi one can buy at H-Mart. However that stuff is now crazy expensive! This kimchi is a bargain comparitively.
In the past in Korea, kimchi was almost typically all home made, though modern Korean families mostly buy it these days, unless Mom or Grandma makes it. In Korea of course one can buy very good commercially made, very fresh kimchi. Here in the US you can find good kimchi at Asian markets for example H-Mart. Kimchi is tricky to distribute because it is alive and highly perishable. It keeps fermenting. We once bought a jar at Whole Foods of a crazy expensive, “Mother In Law’s Kimchi”. When we opened it up, the kimchi exploded out of the jar like a shook-up can of Coke! Jeez, it had really fermented and built up pressure. It made an enormous mess of our entire kitchen and took us about an hour to clean up. On top of which we didn’t find it at all worth the high price ($14?) at Whole Foods.
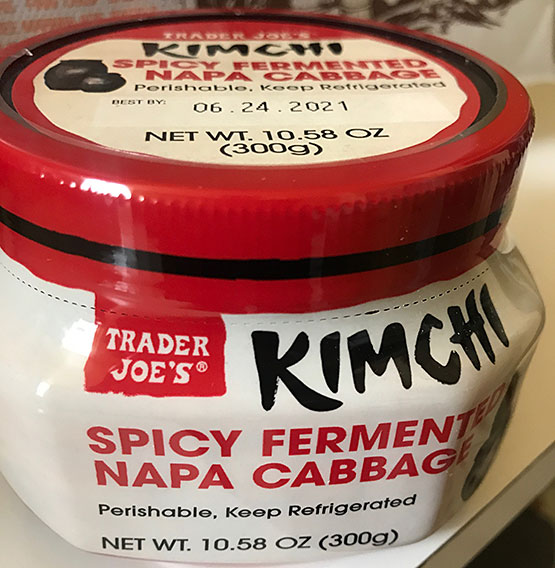
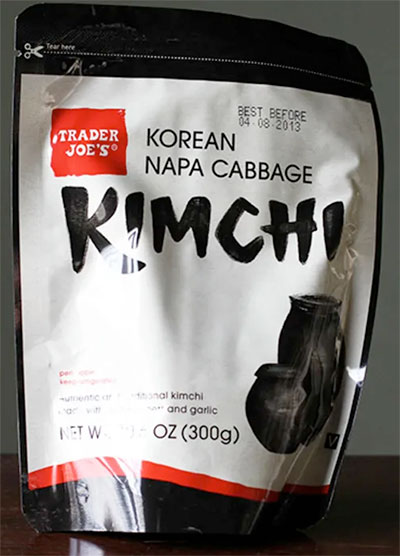
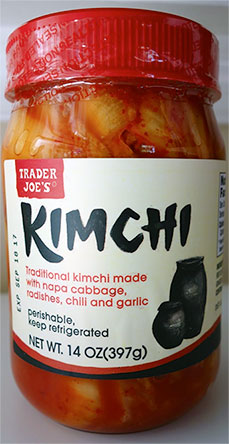
Historically Trader Joe’s has tried their hand selling Kimchi a few times, in different packages (see above). Over the last few years, I would notice some kimchi at Trader Joe’s but it changed or vanished? Either they discontinued it for a spell or maybe they were finding other vendors, changing the packaging, or all of the above. Before TJ’s current version sold in this red plastic jar, they sold kimchi in a plastic pouch (see link) and then in a glass jar. This current version is the third incarnation/package I can recall. I have never been too impressed with TJ’s Kimchi usually giving it a “well its OK”. My short review of this TJ’s latest kimchi attempt remains that: “well it’s OK”. Let’s face it, this kimchi was shipped (by air?) all the way from Korea, probably landed in California, then it has to be distributed by truck all over the US.
In reality TJ’s kimchi is nowhere near to a kimchi you will find at almost any Asian market, like H-MART (wow, see how many kinds H-MART has?!) If you have the chance to buy some at an Asian market, that would be a good base line to compare this to.
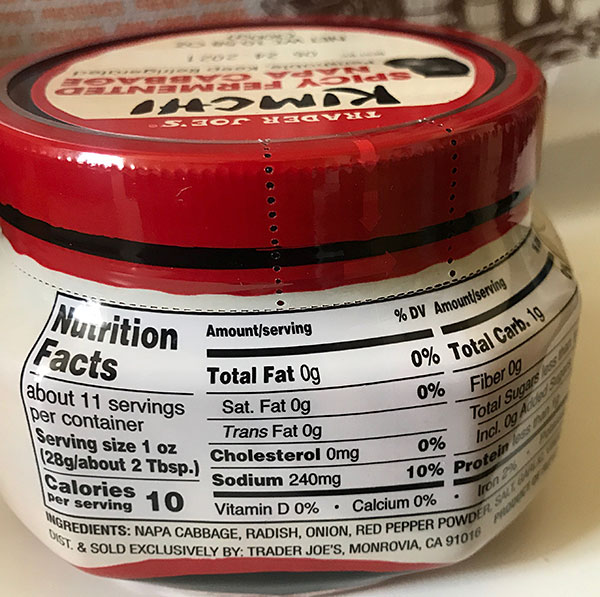
On the plus side Trader Joe’s Spicy Fermented Napa Cabbage Kimchi does have a tangy fermented taste (from lactic acid, which interestingly is even listed as an ingredient?) It doesn’t list any fish products (oysters, squid, or fish sauce) for more Umami like many top brands have, meaning TJ’s kimchi is VEGETARIAN/VEGAN. Is it “Spicy” ? I don’t find it spicy at all, like most kimchi is, though I imagine this is a highly personal taste. Trader Joe’s kimchi is kind of already what I would call just a shade “old” meaning it’s like a Korean supermarket kimchi that we bought say 2-3 weeks ago that had now become more fermented as it sits in our fridge. As kimchi ages and ferments more the taste gets a little more sour, it gets softer, and the green color fades a bit. What we do at this point is we say let’s make something with it. Use it to cook in a dish, for example to make a kimchi fried rice, or maybe “Soon Dubu” (kimchi tofu stew) or Kimchi Pork (Buta Kimchi).
I’m glad TJ’s is at least selling Kimchi and Korean foods like the TTeok Bok Ki. And Jap Chae (both are not bad) or the Korean rice cakes.
So to sum up if you can’t get a really good Kimchi from a Korean store, Trader Joe’s kimchi will do in a pinch. It’s price is amazing (still $4 in 2023) – kimchi in Asian supermarkets has gone up so much, its crazy expensive.
Try TJ’s kimchi with your Pot Stickers. I say cook with it, certainly use this with some leftover rice for some kimchi fried rice, with a fried egg on top. Some more ideas to use the TJ’s kimchi in dishes:
You could make a Kimchi Jigae (kimchi stew) with tofu and kimchi and pork. Tip: TJ’s pork tenderloin is good for this.
This is a very good Kimchi (TOBAGI sliced cabbage kimchi). Bon Appetit reviewed a bunch of kimchi brands and Tobagi was one of them. Its available at HMart if you can get to one; try some really good kimchi and you will understand the difference
DIY Kimchi! No, seriously! I’ve made kimchi. Its good. There are easy kimchi versions that are not terribly hard to make. If you buy a few ingredients at a Korean market you can make your own kimchi and I bet the result will be better than TJ’s kimchi not too mention you will feel like a star when you impress people casually tossing out “You like this kimchi? I made it myself”. Aaron & Claire on YouTube have a great “easy kimchi” recipe using regular cabbage (it’s a kind of “summer kimchi”). I made it and my (Korean-Japanese) wife who has always said the TJ kimchi is at best “meh” told me the cabbage kimchi I made based on Aaron & Claire’s recipe was the best kimchi she had in the U.S. (she was just so impressed this white guy – me – made some good kimchi)
Seriously, if you want a good kimchi, you will be surprised that you can make kimchi yourself. Thanks, Aaron & Claire for a super recipe, and you will find lots of other ones on Youtube and online. I’ve learned so much watching Aaron cook.
You can find toasted Sesame Oil at Trader Joe’s as well as GOCHUJANG (red chili paste) It’s a must have ingredient to do Korean cooking. As well as Korean Red Pepper Flakes (Gochugaru) – needed for making kimchi
Ever hear of SHAKSHUKA ? It’s become kind of cool and trendy in the US. Shakshuka is a popular dish all over the Middle East and North Africa, consisting of peppers and onions in a spicy tomato sauce in which eggs are poached in the sauce. Eaten with fresh pita / bread, it can be breakfast, lunch or dinner! It’s delicious and one currently see’s it in trendy restaurants around the US.
In this version found in TJ’s frozen section they have come up with a “Shakshuka starter” kit meaning this is the base sauce to which you add at an egg or two to finish it, and possibly some other things optionally. I took the package, ran some hot water on the bottom to loosen it up and then slid the contents into a pan (personally I like to cook with fire, I’m not big on microwave). I used my trusty, small black cast iron pan. Add 2 tablespoons of water, cover the pan and cook for about 6-7 minutes till nice and bubbly. When ready, make indentations with the back of a spoon, and carefully slide the eggs into the depressions. If you are talented, you can crack your eggs directly in. If not crack them into a little cup first, then pour them in. Whatever you do try not to break the yolks. The runny yolks will be important to the final dish. Put a cover back on the pan and cook for 2 minutes. Ideally we want the yolks runny. Well at least I do. I also added some cubes of Feta Cheese sprinkled around the top before covering the pan, which adds some great flavor.
Take off your cover and tuck in. You can bring the pan to the table and eat it right out of the pan – typical for shakshuka – or carefully spoon it with the whole egg onto a plate. Drizzle on some very good virgin olive oil, maybe add some chopped parsley, and break the yolks so they run all over. Mop up the eggs and sauce with a spoon and lots of bread like Pita bread (or Naan). This amount is only 9 oz, so say one portion. So you should probably make one for each person. YUMMY!
OPTIONS: you can sauté up some more red peppers and garlic in olive oil if you like and add them in. As noted, cheese such as FETA is very nice addition too. Something spicy like HARISSA, BOMBA, OR GREEN DRAGON sauce to give it some kick is a must IMO. This is not spicy as is. It’s only $1.99. Worth a try.
Lots of people complain about boneless chicken breasts being dry and tasteless.
Cooked correctly and they will not be dry. You can make them turn out juicy and delicious easily with this cooking trick I’ve come up with.
Boneless breasts can quickly go from being moist and juicy to dry very quickly, within just a minute of overcooking. You have to be very careful with your cook time and technique. Over the years I’ve experimented plenty, cooking boneless breasts until I figured out a method that really seems to work well.
Try this the next time you make boneless chicken breast. Here’s my my not-so-secret (shh, secret) way of cooking boneless breasts so they are juicy and delicious. Chefs typically do this.
Chicken breast meat, especially off the bone and with the skin removed, is naturally lean as white (breast) meat doesn’t have enough internal fat, like dark chicken meat (such as thighs. That is why chicken thighs are so much more forgiving and easier to cook without them getting overcooked and dried out.
The trick with cooking boneless breasts is basically to get a very nice sear on both sides, so they get flavor from browning (ie the Maillard reaction). Once browned on the outside, just turn off the heat. Let them finish cooking in the pan with the cover on and the heat offusing residual heat .
That’s the secret in a nutshell. Details follow….
Here’s the general outline of my method: Season/Marinate. Sear on both sides. Turn off heat. COVER PAN. WAIT.
Chicken breasts – Fresh or Frozen.
During Covid-19, I started buying frozen breasts instead of fresh at Trader Joe’s. Sure I usually would prefer fresh over frozen but I as I (didnt) want to go to a store as often, having frozen chicken breasts in the freezer is very practical. TJ’s sells them prepped and quick frozen in 2.5 lb bags, either “whole breasts with rib section” which are a big whole breasts or you can get portioned, trimmed up ones which are half a breast and make a perfect portion per person. They run about 7 or 8 dollars a bag. And there is an Organic option which doesn’t cost much more than the regular ones so you might opt for those. If I get them frozen, I let them do an overnight defrost (more like a full day) in the fridge – how long will depend on how thick they are. As I have mentioned many times in this blog, I always use the slow defrost method, as it is the best method for defrosting almost everything. If you rush the defrosting and say leave it out on the counter you will see liquid run out of the meat. Then your chicken will be drier no matter how you cook them.
Fresh: Naturally if you prefer to use fresh boneless chicken breasts, this same cooking method works equally well with fresh breasts. Fresh of course is the “normal” way I would buy chicken pre-Covid-19 and have also at times bought fresh breasts when they were on sale, prep and and freeze them myself. It’s just a little more work, but if they are ever $1.99 /lb on sale at my supermarket, its worth it.
HOW TO COOK JUICY BONELESS CHICKEN BREASTS :
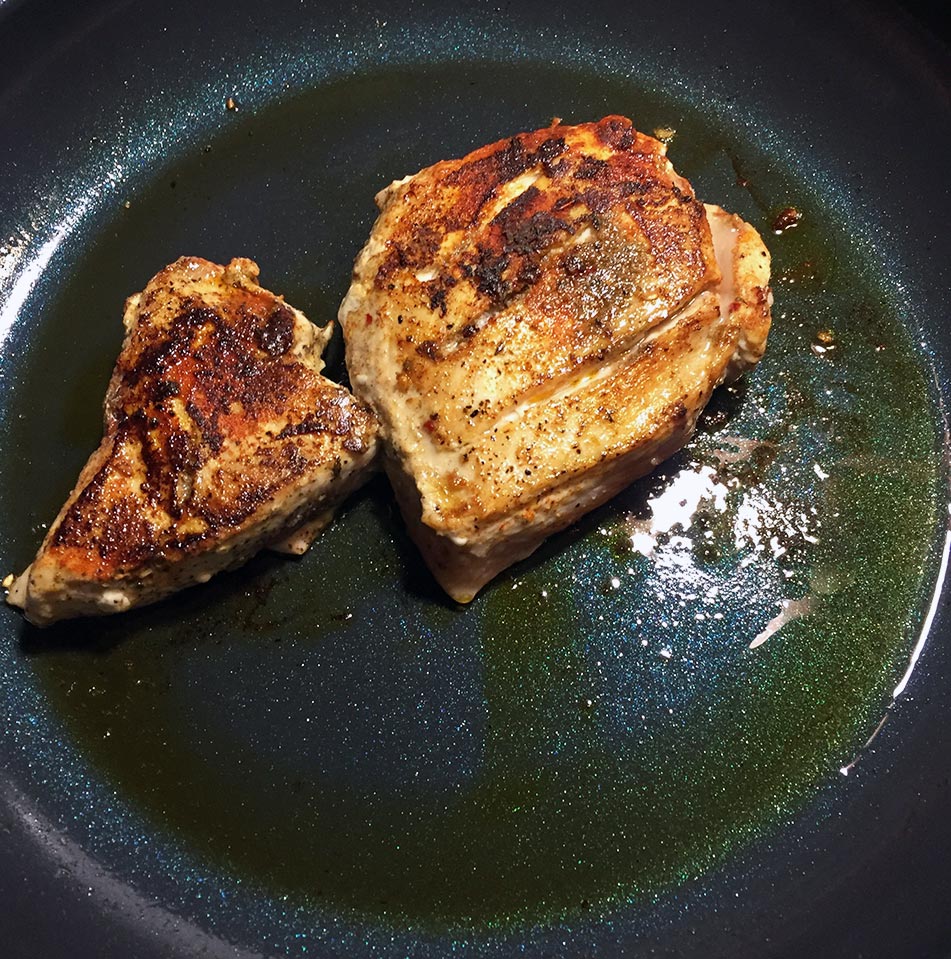
Prep and trim the breasts. Season and/or marinate the meat (use a spice rub or marinade). In the picture above I used some TJ TACO SEASONING all over the breasts. Its a tasty and convenient spice blend I think actually works well with chicken as well as beef. Its a cumin and chile “mexican” spice blend. AJIKA works great too. Of course any mix or blend of spices of your choosing will work. Smoked Spanish Paprika is great to add as it helps browning and is very flavorful (TJ carries it in a tin). I almost always add fresh garlic. Rub spices all over. Salt/pepper to taste. Let the seasoned chicken marinate/sit for 20-30 minutes on the counter. TIP: Rub some Olive Oil (EVOO) over the chicken before adding the spices and they will stick better. Some people like a sprinkle of some coating (a bit of flour, or breadcrumbs or Panko). What we are going for is a nice golden brown color on both sides of the chicken.
Put a tablespoon of olive oil (or oil and butter mix) in your pan (Non-stick or Cast Iron). Cast iron is terrific. Get your pan hot on medium heat. Add chicken breasts and let them sear: They should sizzle as soon as they touch the pan.
NOW – DO NOT TOUCH or move the breasts in the pan for 3-5 minutes — wait until you see a good “Golden Brown and Delicious” sear on the bottom. Good browning is crucial for flavor (aka the Maillard effect). When bottom side is done, use a spatula to release the chicken. Flip the breasts over and cook the other side – but only about 2-3 minutes on side two (!)
Now turn off the fire and immediately put a tight fitting lid on your pan. Do not peek or open the cover for 7-10 minutes (we don’t want to let the precious steam that will finish cooking them) TIP: (optional) Squeeze a quarter lemon in the pan before closing the lid, quickly. Throw the peel in too. Set your timer for 7-10 minutes to let the breasts finish cooking in the covered pan. Thats the whole trick, letting residual steam and heat finish them, slowly. Voila! Juicy Breasts with a ton of flavor.
This little trick to cook juicy boneless breasts is that easy. With this method, the seared breasts are not cooked all the way through the middle but will finish cooking in the “closed, moist environment” inside the pan. Now you may have to play around with your own actual timing, adjusting a little bit either more or less based on thickness of chicken and what type of pan (thicker pans and cast iron hold heat well). What we are aiming for in the cooking is getting them just over the line of seeing any pink or rawness. After they are just past the point of not being pink you get them out of the pan and rest them on a plate or cutting board for about 4-5 minutes (some foil over them will help keep them warm). Resting keeps juices in. The breasts should be cooked through (don’t slice before resting them, but once rested you can “peek” in a thick section). Remember meats continue cooking a bit from residual heat inside.
In the photo the bigger thicker piece did need another 30-60 seconds to finish cooking completely so I just put it back with the cover on with a lowish flame for one minute. Its way easier if they are a bit underdone to cook them a little bit more then overcook them. You can also make shallow slashes in the thicker part of a breast prior to seasoning them to help even things out with the thinner parts as heat will penetrate the slashed part easier. Or you can pound the thick part flat with a pan a bit which will even them out. Anyway give this method a few tries and you will figure out your exact timings depending on a few factors (chicken thickness, heat source, pan thickness, etc). Electric stoves of course have a great deal of residual heat after they are shut off so Wait Time would really need to be much less (or just move the pan to a cool burner). If your chicken is still coming out “dry” with this Sear & Cover Method, you will need to deduct a minute of the outside browning time especially after you turn them. Conversely if its pink in the thickest part add a tiny bit more time. You can also try it with the lid on for the second side browning, but deduct a minute or two as the steaming effect inside the pan will be more intense. Now that you know this sear and cover method, you can experiment. If you like the results please let us know in the COMMENTS section.
Naturally serving these with a tasty sauce is great for flavor plus keeping things moist too. Try yogurt and Green Dragon or Zhoug -or- yogurt and lemon, or just deglaze the pan with a tiny bit of stock, wine or even just water and using the scrapings, and a bit of butter to make a few tablespoons of pan sauce. If you want a slightly thick sauce, add a pinch of cornstarch slurry.
Hope you enjoy this basic technique. If you want to explore cooking boneless breasts by poaching them instead of grilling, the Kitchn has a detailed explanation and good cooking technique for POACHED BONELESS CHICKEN BREASTS (LINK BELOW) Poaching is great for moistness, but you don’t get the intense flavor of grilling.
Reported Discontinued during the Summer of Covid-19, Trader Joe’s Organic Sriracha Ranch Dressing. The one and only super versatile stuff, which I just adore, well, make that adored (big sigh!)
This is one of Trader Joe’s best products which I previously reviewed with a RAVE– so I find this particularly shocking! WTF, Trader Joe’s?! Just to make sure it was not just out of stock for a long time, I when to my store’s Captain to ask him to check the status. Unfortunately he confirmed my worst fear – “It’s been Disco’ed”(discontinued)
Other than start a campaign to bring it back (has this ever worked?) I will be stingy using the little bit left of the bottle in my fridge now. I may experiment with a DIY version. Some TJ’s RANCH DRESSING mixed with Sriracha or Green Dragon sauce. I won’t be as good but maybe better than nothing
If you are as shocked or mad, please leave your opinions about this in COMMENTS. Things like this were the reason I started this site in the first place.
RECIPE for something in the ballpark. Not the same, but not pretty good. I mixed some TJ PERI PERI sauce with some Suzie’s MAYO and it was pretty tasty, in the Sriracha Ranch ballpark.
(UPDATE: This product is no longer available. It was replaced by “Organic Couscous“)
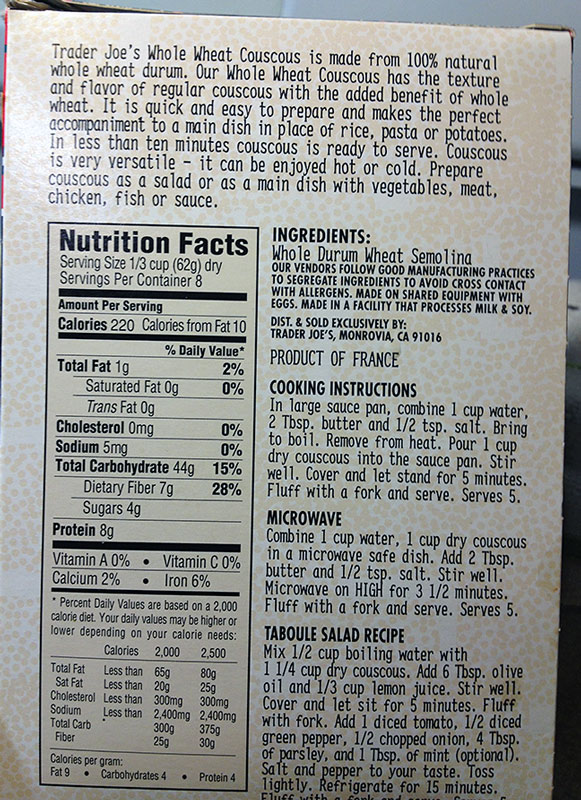
I always keep a box of TJ Whole Wheat Couscous in my pantry as it’s incredibly fast and easy to make staple, quicker to make than for example rice or even pasta. It’s versatile, healthy, and tasty. Couscous (“koos-koos”) is a pasta-like grain made from wheat that is a staple of North African cuisine, in Algeria and Morocco. It’s even part of Sicilian cuisine (Arab influence from the Moors)
Couscous is generally made out of semolina wheat. Trader Joe’s sells this whole grain version made from whole durum semolina. The box says PRODUCT OF FRANCE (yeah baby!) The French love couscous. I have lived in Paris where they have couscous restaurants almost like we have pizza places as there are so many people of Algerian and Morrocan origin.
One of the reasons I love couscous, is it its so fast and easy to make. It is ready in 5 minutes. Here’s the basic method: Put a cup of water in a pot. Bring it to a boil. Add Salt and Butter (or olive oil) Dump in a cup of this couscous (1-1 ratio). Turn off the fire, cover the pot, and let it sit for five minutes, then fluff it up with a fork. Thats it, done!
You can use couscous as a side dish, as you would rice or pasta. It really soaks up sauces or stews. Use it as a “bed” for your Main and add a bit of sauce on top. It’s a great base for a “protein bowl”. You can do other things as well with it like serve it as a salad or make a super healthy couscous tabouli salad hot or cold. A box of Trader Joe’s French imported Whole Wheat Instant Couscous sells for only $1.99 for 500 grams, (a bit over a pound). This is an excellent product to always keep on hand in your pantry and try. Here are some links related to peruse.
Pizza (No Knead Dough) Canned crushed tom., fresh tomato, garlic, mozz, Grana Padano, EVOO, arugula topping…
Once you really get into making your own pizza, the next evolutionary step for you to take might be to make your own dough!
No…really! Its easier than you think. Especially now as over the last few years there’s been a kind of revolutionary dough recipe and technique that has caught on like wild fire. I’m referring to “No Knead Dough” which thanks to both its creator, Jim Lahey of the Sullivan Street Bakery, and the internet, which has spread the recipe to an enormous number of people who’ve tried it, has started many, including yours truly on this truly DIY fun and tasty path.
You can learn a lot by watching Jim Lahey show how to make homemade pizza with no knead dough:
No-Knead Pizza Dough Adapted from Jim Lahey, Co.
Makes four 12-inch pizza crusts OR 1 large square sheet pan pie
3 cups all-purpose or bread flour, plus some more for dusting {Trader Joe’s White Flour does well}
¼ teaspoon instant yeast (such as SAF brand)
1½ teaspoons salt
1½ cups water
1. In a large bowl, mix the flour with the yeast and salt. Add the water and stir until blended (the dough will be very sticky). Cover the bowl with plastic wrap and let rest for 12 to 24 hours in a warm spot, about 70°.
2. Place the dough on a lightly floured work surface and lightly sprinkle the top with flour. Fold the dough over on itself once or twice, cover loosely with plastic wrap and let rest for 15 minutes.
3. Divide the dough into 4 pieces and shape each piece into a ball. Generously sprinkle a clean cotton towel with flour and cover the dough with it. Let the dough rise for 2 hours (If you are doing a square style pizza then keep the dough in one piece)
4. Stretch or toss the dough into the desired shape, cover with toppings and bake on top of a very hot pizza stone. …Or stretch dough out onto sheet pan, add toppings and bake. Hot oven, 500, until it looks done.
This is a jar of some “DIY fast-and-easy peach “jam” or “preserves”. I’m using the quotation marks because it is not the fully “preserved” type that will last months and months. Rather I make this to keep in the fridge, aka “refridgerator jam”. Its EASY and DELICIOUS, fast and much cheaper than store jams. You can make it in half hour.
Of course one could make this with Trader Joe’s very nice
Buy some fruit. It should be fairly ripe. To make these fast jams, I usually buy the “quick sale” stuff at the supermarket that is over ripe, not perfect looking…but this is exactly what is perfect for making jam. Fruits: you can use peaches, nectarines, plums, pears, figs, strawberries, other berries. Have a fresh lemon on hand too. Sugar – Trader Joe’s sugar is perfect. But honestly almost any sugar will do (real sugar not fake). What matters is that you need to cook this a fairly long time. Use a heavy sauce pan.
Its not a hard and fast recipe. More like a basic recipe / ratio with many, many variations.
SIMPLE HOMEMADE FRIDGE JAM
Ingredients: About 1-2 lbs of fruit. Eg – Peaches, about 6 large.
Wash and cut up the fruit into small pieces. I do this directly into the pan. I throw in the pits too (will fish out later, or not) as I think they have natural pectin which will help with the ‘jelling’. I put about 1/2-cup to 1 cup of sugar. While that may sound like a lot its not, as it will all cook down, and the sugar will make it jell in this recipe.
Cook the mixture at a medium-high heat. You want a low boil that will not boil over (your pan should be big enough so that it has high sides and room). Watch it. Cook it stirring occasionally, for about 40-45 minutes total. Check it and stir it every 10 minutes. What you want is for it to all fall apart, and the fruit to mostly disintegrate. What looked like a lot of fruit will become a much smaller amount after its cooked down. At the end, I squeeze in half a lemon or lime’s juice. Let it cool, place in a jar and refrigerate for a few hours. It should thicken up. Use within a few weeks. This won’t be hard, trust me! It probably won’t last that long.


:max_bytes(150000):strip_icc():format(webp)/__opt__aboutcom__coeus__resources__content_migration__serious_eats__seriouseats.com__images__20110304-kimchi-taste-test-tobagi-d374314cc1b04935a5b58bb399ba4d0f.jpg)


Recent Comments