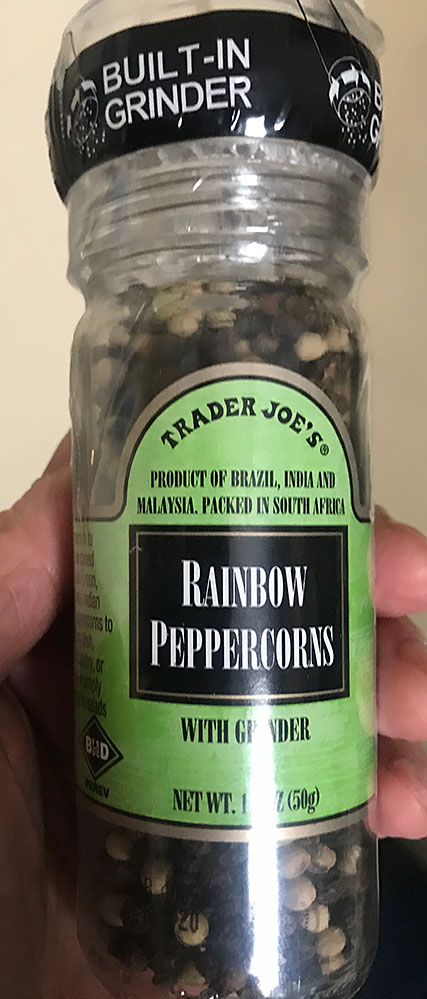
This may seem ho-hum because we are so used to seeing it by now but come on, let’s admit the spices TJ sells in built-in grinders are one of the greatest product innovations in history. I’m serious. Since all spices taste best freshly ground, it’s a huge plus that you can buy not just whole peppercorns but a number of spices & spice blends in these plastic grinders at TJs. I particularly am fond of TJ’s RAINBOW PEPPERCORNS. It’s especially nice as it’s a blend of 3 peppercorns from 3 different continents! They come from Brazil, India and Malaysia. Packed in South Africa. Wow. Peppercorns have gone up in price and I think this used to sell for $1.99, it’s now $2.29. Its the same price as a tin TJ sells of ground pepper so I would say this is better. I buy pepper grinders in pairs, one for the kitchen and one for the table.
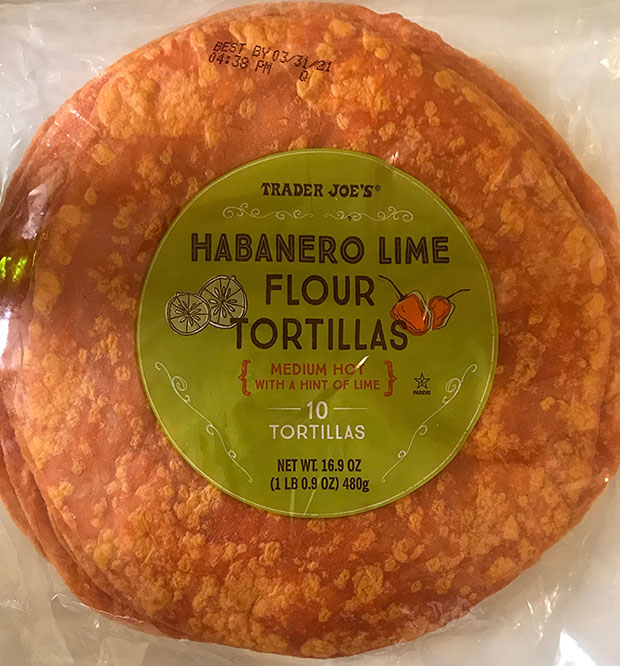
Trader Joe’s HABANERO LIME FLOUR TORTILLAS ($2.69, 17 oz package of 10)
Some countries have regional food “divides”. For example traditionally in Mexico in the North they lean towards using flour tortillas (Tortillas de Harina) while in Southern Mexico mostly they prefer corn (Tortillas de maiz). I generally prefer corn tortillas as they’re more flavorful and have a chewier texture especially when cooked. Still sometimes I buy flour tortillas as they have certain qualities that make them useful for some things. For one, flour tortillas are softer and more pliable so easier to fold. They are usually bigger too so can hold more ingredients inside which is why they are used for burritos. They can also be used for sandwich “wraps” too. Trader Joe’s HABANERO LIME FLOUR TORTILLAS are an interesting choice as they bring a bit of flavor to the tortilla. These have a little bit of heat in them from habanero chiles, plus a bit of lime flavor. They have a lovely color, tinted reddish orange from anatto seed (a natural food coloring). Package says “MEDIUM HOT” but remember when you add fillings that moderates the spicy level.
Last night, I made Quesadillas (vegetarian actually) for dinner with these Habanero/Lime tortillas. Filling was: Pepper Jack Cheese, Soy Chorizo and TJ’s Refried Salsa Pinto Beans (which I gussied up*). Topping of avocado, tomato, more cheese and Green Dragon Sauce… More Refritos on the side…. They were really tasty!
TIP – Out of the can, TJ’s Salsa Pinto Refried Beans are really boring. They need a little work if you want them to have some taste. I add olive oil, oregano, cumin, chile powder and a little Green Dragon or Zhoug. Cuban Style Spice Blend works great with these or any beans. Warm frijole refritos over low heat, stirring often so the bottom doesnt burn. Some cheese on top is nice!
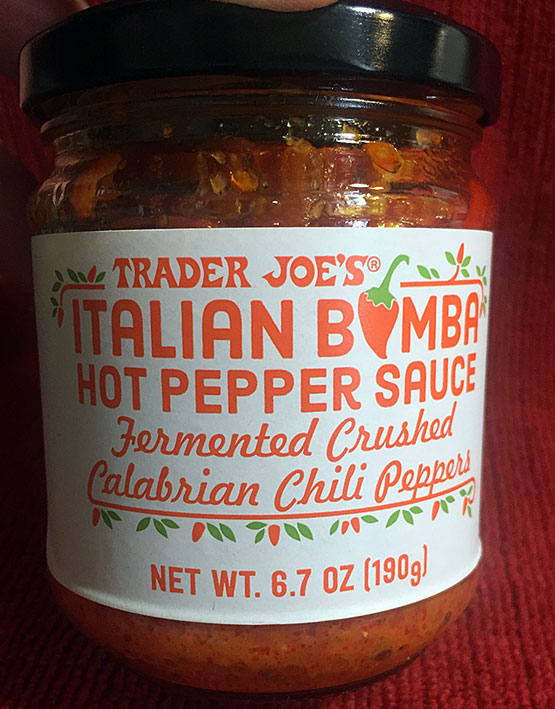
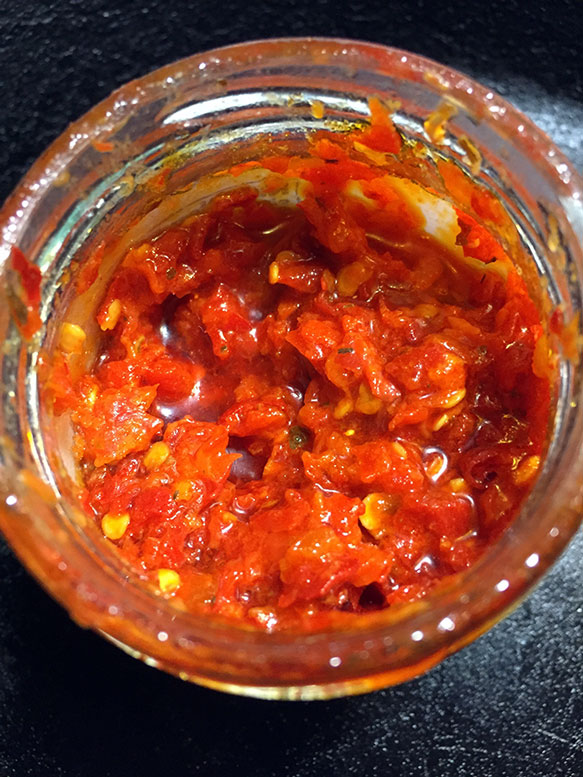
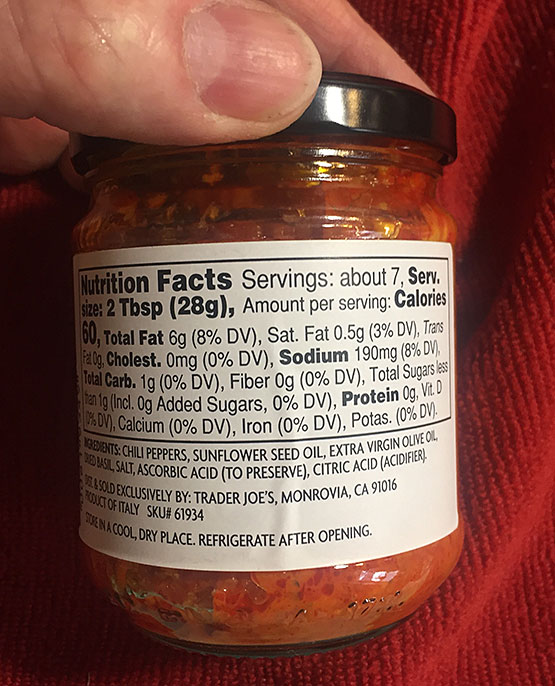
Since it first appeared, Trader Joe’s Italian “Bomba” Hot Pepper Sauce blew up all over the internet as one of Trader Joe’s best new offerings. In this case, any hype you’ve heard about how good TJ’s “BOMBA” is, is 100% justified. This stuff is incredible. Sorry I won’t be saying “it’s the bomb” (even though it is). However I will tell you that we just freaking LOVE this stuff, and put it on many, many things. Since first trying this its become a condiment that we have to have in the fridge at all times. Here’s why.
BOMBA is a condiment made from crushed up fresh Calabrian red chile peppers that get fermented. By now I’m sure you’re well aware about how fermentation adds complex flavor elements to foods. When you taste this paste you will notice a little bit of funkiness. That is it’s fermentation and it adds a magical addition of, you guessed it, UMAMI. Giving this stuff more complexity than just a “hot sauce”. Now Bomba sauce is a bit spicy but it’s not really spicy. It’s nowhere near a knock-your-head-off hot sauce, skulls on the label, kind of spicy. This has a tolerable level of spicy PLUS flavor! As a spiciness test, I just put a small spoon of Bomba in my mouth. While I got “yes this is spicy”, it didn’t want to make me want to drink a glass of milk or anything. I got something beyond just “spicy”, there that funkiness, even a bit of sweetness. So depending on the amount you use, you can adjust the level of spicy to your taste and palate, and if you add even just a tiny bit to dishes – I’m talking a quarter of a teaspoon – it will add wonderful flavors that may surprise you.
How to use Bomba ? Of course this is going to be great added to tomato sauces, say on pasta or pizza or what have you. But what about other pasta dishes? A spoonful mixed into your Spaghetti Aglio e Olio? For sure! A little bit in your Carbonara? Controversial perhaps but I do it, and it is terrific. What about all those Gnocchi you love from Trader Joe’s? Regular, cauliflower, kale, shelf stable or what have you… OMG folks, a dollop of this Bomba with garlic and good olive oil will make your gnocchi soar. Still, Bomba is more than “just for Italian” food. I put a little bit into my scrambled eggs. It’s divine with eggs of any kind. A drop of it onto of my buttered, toasted baguette is great. A little bit mixed into avocado toast or guacamole. Add a little bit of Bomba to your marinade for meat or chicken. Dips and sauces? Perfect. You can mix this up with some Greek yogurt (or mayonnaise for that matter) for an instant wonderful sauce, to top some cooked Chicken Breasts, Shrimp, or Tofu as well. Or try that mix as a dip for some chips. Drizzle some with olive oil and garlic on your roasted veggies. Add a spoon of this to your soup or most any sauce to give it some jazz. I even love it on cottage cheese on toast (no, seriously that’s really good). On my sardines on toast. I suggest adding some fresh garlic when using Bomba. Of course these two go very well together. Asian food?! OMG yes, yes, yes! Honestly the list of things and types of food Bomba can improve and go with is endless and I promise, you will discover uses on your own (please share some with us in the COMMENTS below). TJ’s Bomba is truly a premium gourmet offering. Amazingly Trader Joe’s sells this for $2.99 a jar, which is honestly incredible for such a product. Oh and it’s really Italian, it is a “Product Of Italy”. I have found it sold out on occasion as its a big hit. So if you like it, next time grab an extra jar to keep in the pantry like I do (but just one, leave some for me, and the next guy!) Ingredients are: Chilies, Sunflower Oil, Olive Oil, Basil, Salt, Ascorbic Acid, Citric Acid. Honestly even if you are not really the “hot sauce type” I suggest you get a jar of this to try. Calabrian chili’s are not super hot; they are in the “medium” spice level. People can pop them in their mouths easily. Personally I can’t live without having a jar of Bomba in the fridge now and if you try this, you may feel exactly the same.
TIP: I add a bit of Extra Virgin Olive Oil after I open the jar to “seal the top” off from air and keep it freshest for longer. Keep the jar in the fridge. Take it out 15 minutes before using if its congealed.
If you tried BOMBA and have any Comments feel free to share them.
Lots of people complain about boneless chicken breasts being dry and tasteless.
Cooked correctly and they will not be dry. You can make them turn out juicy and delicious easily with this cooking trick I’ve come up with.
Boneless breasts can quickly go from being moist and juicy to dry very quickly, within just a minute of overcooking. You have to be very careful with your cook time and technique. Over the years I’ve experimented plenty, cooking boneless breasts until I figured out a method that really seems to work well.
Try this the next time you make boneless chicken breast. Here’s my my not-so-secret (shh, secret) way of cooking boneless breasts so they are juicy and delicious. Chefs typically do this.
Chicken breast meat, especially off the bone and with the skin removed, is naturally lean as white (breast) meat doesn’t have enough internal fat, like dark chicken meat (such as thighs. That is why chicken thighs are so much more forgiving and easier to cook without them getting overcooked and dried out.
The trick with cooking boneless breasts is basically to get a very nice sear on both sides, so they get flavor from browning (ie the Maillard reaction). Once browned on the outside, just turn off the heat. Let them finish cooking in the pan with the cover on and the heat offusing residual heat .
That’s the secret in a nutshell. Details follow….
Here’s the general outline of my method: Season/Marinate. Sear on both sides. Turn off heat. COVER PAN. WAIT.
Chicken breasts – Fresh or Frozen.
During Covid-19, I started buying frozen breasts instead of fresh at Trader Joe’s. Sure I usually would prefer fresh over frozen but I as I (didnt) want to go to a store as often, having frozen chicken breasts in the freezer is very practical. TJ’s sells them prepped and quick frozen in 2.5 lb bags, either “whole breasts with rib section” which are a big whole breasts or you can get portioned, trimmed up ones which are half a breast and make a perfect portion per person. They run about 7 or 8 dollars a bag. And there is an Organic option which doesn’t cost much more than the regular ones so you might opt for those. If I get them frozen, I let them do an overnight defrost (more like a full day) in the fridge – how long will depend on how thick they are. As I have mentioned many times in this blog, I always use the slow defrost method, as it is the best method for defrosting almost everything. If you rush the defrosting and say leave it out on the counter you will see liquid run out of the meat. Then your chicken will be drier no matter how you cook them.
Fresh: Naturally if you prefer to use fresh boneless chicken breasts, this same cooking method works equally well with fresh breasts. Fresh of course is the “normal” way I would buy chicken pre-Covid-19 and have also at times bought fresh breasts when they were on sale, prep and and freeze them myself. It’s just a little more work, but if they are ever $1.99 /lb on sale at my supermarket, its worth it.
HOW TO COOK JUICY BONELESS CHICKEN BREASTS :
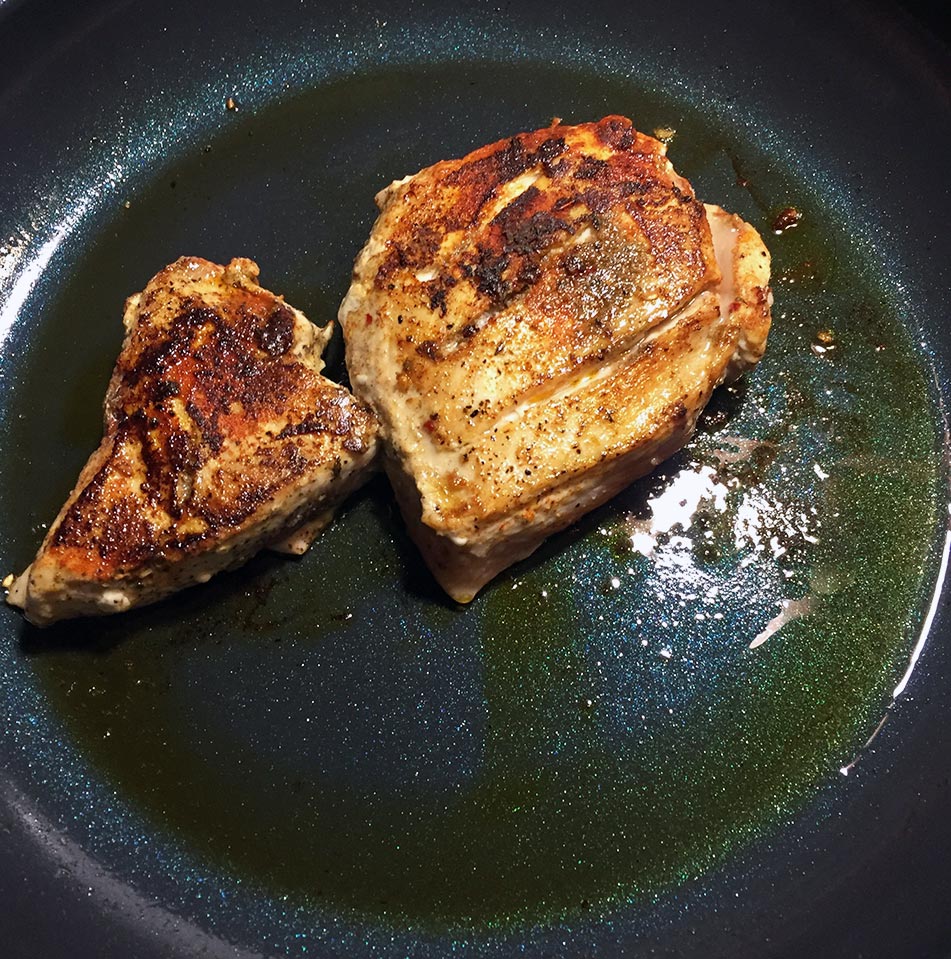
Prep and trim the breasts. Season and/or marinate the meat (use a spice rub or marinade). In the picture above I used some TJ TACO SEASONING all over the breasts. Its a tasty and convenient spice blend I think actually works well with chicken as well as beef. Its a cumin and chile “mexican” spice blend. AJIKA works great too. Of course any mix or blend of spices of your choosing will work. Smoked Spanish Paprika is great to add as it helps browning and is very flavorful (TJ carries it in a tin). I almost always add fresh garlic. Rub spices all over. Salt/pepper to taste. Let the seasoned chicken marinate/sit for 20-30 minutes on the counter. TIP: Rub some Olive Oil (EVOO) over the chicken before adding the spices and they will stick better. Some people like a sprinkle of some coating (a bit of flour, or breadcrumbs or Panko). What we are going for is a nice golden brown color on both sides of the chicken.
Put a tablespoon of olive oil (or oil and butter mix) in your pan (Non-stick or Cast Iron). Cast iron is terrific. Get your pan hot on medium heat. Add chicken breasts and let them sear: They should sizzle as soon as they touch the pan.
NOW – DO NOT TOUCH or move the breasts in the pan for 3-5 minutes — wait until you see a good “Golden Brown and Delicious” sear on the bottom. Good browning is crucial for flavor (aka the Maillard effect). When bottom side is done, use a spatula to release the chicken. Flip the breasts over and cook the other side – but only about 2-3 minutes on side two (!)
Now turn off the fire and immediately put a tight fitting lid on your pan. Do not peek or open the cover for 7-10 minutes (we don’t want to let the precious steam that will finish cooking them) TIP: (optional) Squeeze a quarter lemon in the pan before closing the lid, quickly. Throw the peel in too. Set your timer for 7-10 minutes to let the breasts finish cooking in the covered pan. Thats the whole trick, letting residual steam and heat finish them, slowly. Voila! Juicy Breasts with a ton of flavor.
This little trick to cook juicy boneless breasts is that easy. With this method, the seared breasts are not cooked all the way through the middle but will finish cooking in the “closed, moist environment” inside the pan. Now you may have to play around with your own actual timing, adjusting a little bit either more or less based on thickness of chicken and what type of pan (thicker pans and cast iron hold heat well). What we are aiming for in the cooking is getting them just over the line of seeing any pink or rawness. After they are just past the point of not being pink you get them out of the pan and rest them on a plate or cutting board for about 4-5 minutes (some foil over them will help keep them warm). Resting keeps juices in. The breasts should be cooked through (don’t slice before resting them, but once rested you can “peek” in a thick section). Remember meats continue cooking a bit from residual heat inside.
In the photo the bigger thicker piece did need another 30-60 seconds to finish cooking completely so I just put it back with the cover on with a lowish flame for one minute. Its way easier if they are a bit underdone to cook them a little bit more then overcook them. You can also make shallow slashes in the thicker part of a breast prior to seasoning them to help even things out with the thinner parts as heat will penetrate the slashed part easier. Or you can pound the thick part flat with a pan a bit which will even them out. Anyway give this method a few tries and you will figure out your exact timings depending on a few factors (chicken thickness, heat source, pan thickness, etc). Electric stoves of course have a great deal of residual heat after they are shut off so Wait Time would really need to be much less (or just move the pan to a cool burner). If your chicken is still coming out “dry” with this Sear & Cover Method, you will need to deduct a minute of the outside browning time especially after you turn them. Conversely if its pink in the thickest part add a tiny bit more time. You can also try it with the lid on for the second side browning, but deduct a minute or two as the steaming effect inside the pan will be more intense. Now that you know this sear and cover method, you can experiment. If you like the results please let us know in the COMMENTS section.
Naturally serving these with a tasty sauce is great for flavor plus keeping things moist too. Try yogurt and Green Dragon or Zhoug -or- yogurt and lemon, or just deglaze the pan with a tiny bit of stock, wine or even just water and using the scrapings, and a bit of butter to make a few tablespoons of pan sauce. If you want a slightly thick sauce, add a pinch of cornstarch slurry.
Hope you enjoy this basic technique. If you want to explore cooking boneless breasts by poaching them instead of grilling, the Kitchn has a detailed explanation and good cooking technique for POACHED BONELESS CHICKEN BREASTS (LINK BELOW) Poaching is great for moistness, but you don’t get the intense flavor of grilling.
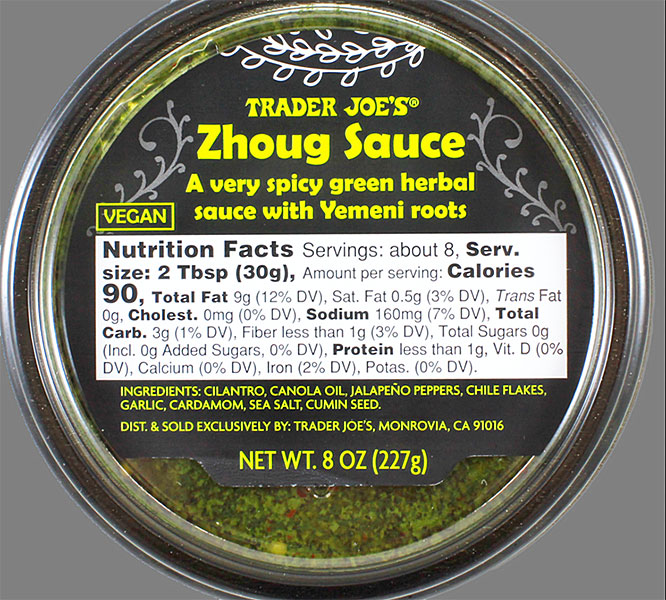
Trader Joe’s ZHOUG SAUCE is a very delicious, traditional Yemeni green hot sauce. It is taking the internet by storm. Warning, when it says “very spicy” here, Trader Joe’s is not kidding. It is SPICY! But it is delicious, not just “spicy”, it’s so flavorful if you try this, you may fall in love with it too, as I have. This sauce is a must have for me in the fridge always. For me, this is a Top 10 Trader Joe’s product.
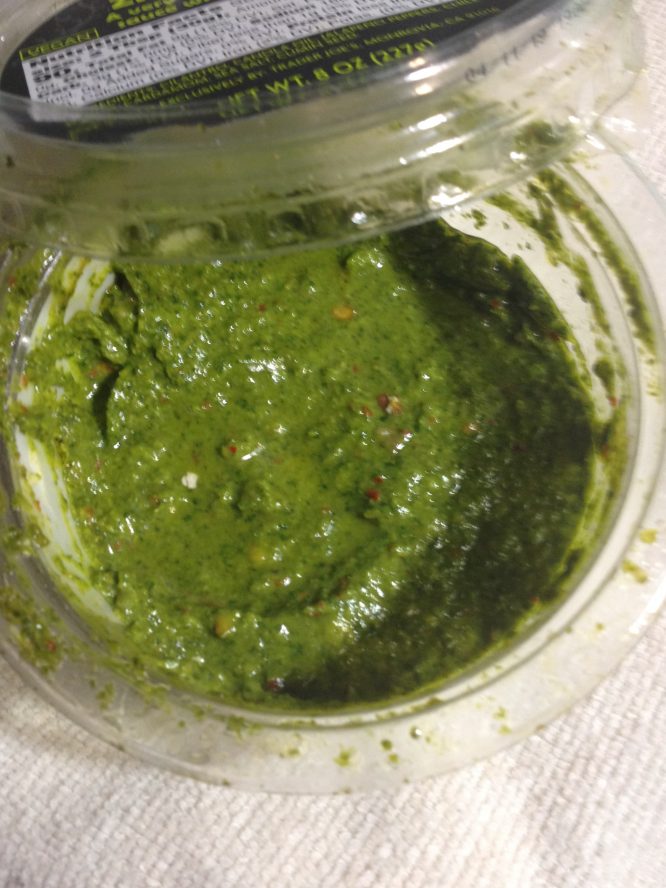
Trader Joe’s ZHOUG (sometimes written ZHUG) is a thick green, herbal sauce originating from Yemen, made from cilantro, jalapenos and chile flakes, wonderfully seasoned with garlic, cumin and cardamon. It’s popular in the middle east. TJ’s ZHOUG is simply one of the the most bloody wonderfully unique condiments you may ever taste. I’ve tried it on just about everything you can think of…chicken, tofu, eggs, fritattas, pasta, fish…. you name it. It makes almost any food better. You can’t go wrong with this on just about anything you put it on, it will make you smack your lips, yum. I suspect it would be good on shoe leather. You can use just a little bit and get a lot of flavor, and you will probably use this in small amounts, just a few dashes as its so spicy. A little goes a long way. Also you can “tame” it easily by mixing it with some yogurt, or mayo. Frankly this was even a bit too spicy even for me, kind of a rare statement. So unless you are a total chile-head, capsaicin obsessed, death-head sauce freak, you might want to “tame” this sauce a tiny bit, as I tried and did easily. I just added some olive oil and lemon juice to cut down the heat ever so slightly by dilution. It was still excellent this way. I have also use it mixed into Greek yogurt (or regular yogurt) with great success. In fact, Yogurt and Zhoug are an excellent combo and make a wonderful, easy creamy variation. Adjust the ratio of yogurt to zhoug till its perfect for your personal taste. I actually like the Zhoug tamed a wee bit. As is out of the container just a few small dollops is enough to make your mouth on fire. Again if you’re a chile-head you will love that, so pour it on. How long does it last in the fridge? I’ve found it lasts for quite some time, maybe a month. I also have found if I cover it with olive oil, the oil will help it last even longer, maybe up to 2 months.
You will find TJ’s ZHOUG SAUCE in the refrigerated section in an 8 oz container which is $2.99. Frankly this is a steal (but don’t tell TJ’s lest they raise the price) update: They did raise it a bit!
Seriously you should try this. IMHO this is a Top-10.
“Zhoug likely originated in Yemen, and is now popular throughout the Middle East. It’s a cilantro-based sauce/condiment that’s been likened to “Middle Eastern pesto,” but we think that description shortchanges the originality of this spicy, fragrant, fabulously flavorful culinary creation. It’s a sauce that’s taking the internet by storm – from food blogs to social media feeds, Zhoug is having its moment in the digital sun. This really is the ideal time to introduce Zhoug to our stores.
Trader Joe’s Zhoug Sauce comes to us from a California vendor well-versed in the art and science of Middle Eastern foods. Here, they’ve put together a very straightforward collection of ingredients – cilantro, canola oil, jalapeño peppers, chile flakes, garlic, cardamom, sea salt, and cumin seeds – to create a sauce/dip/spread/ condiment that bursts with vibrant flavor and color. We call it “very spicy” on our label, and some will find it “very spicy.” Those more into spicy foods may find it only moderately spicy. Everyone who tries it will be impressed by how the flavor of every ingredient comes through, even as the flavors blend beautifully into the finished product.”
(update: I still give this a Rave but I do have a Rant about the continuous price increases since I originally wrote this post. (from $4.49/lb-> to currently 6.99)
I don’t know about you but it’s pretty rare for me to buy pre-marinated meats. Generally I will just make my own and marinate it myself.
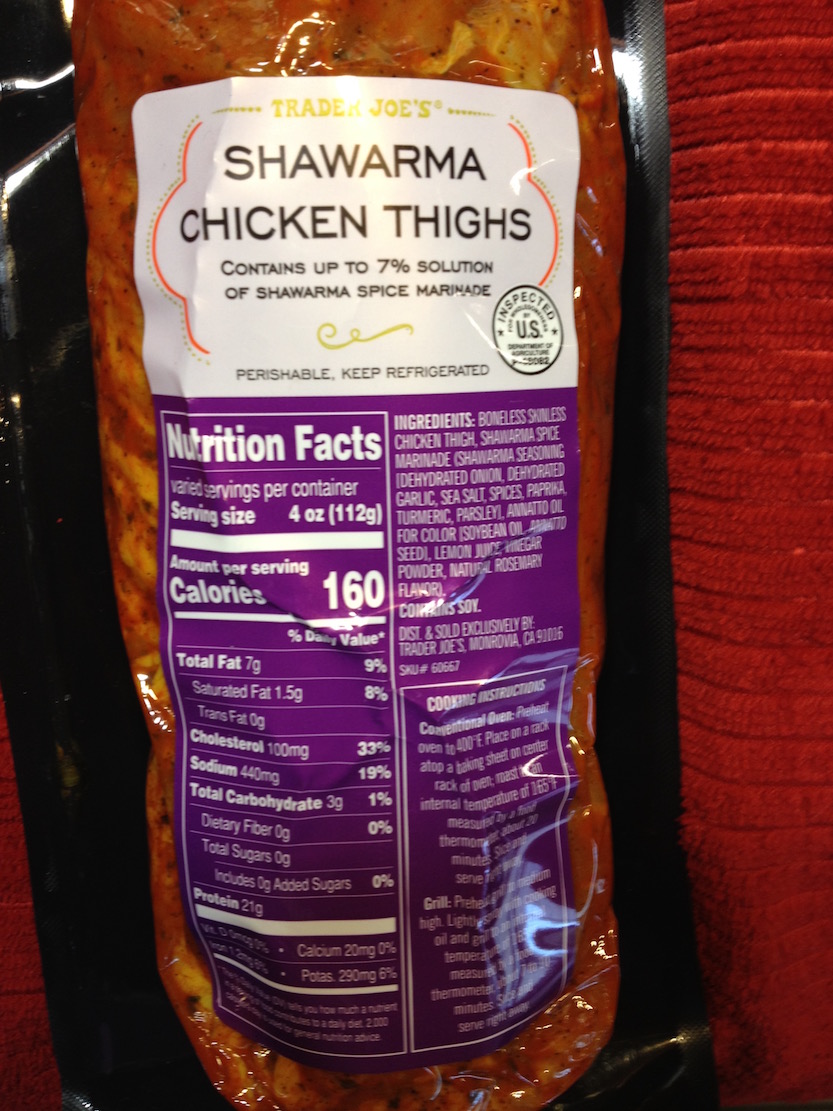
Still when I first saw Trader Joe’s “Shawarma Chicken Thighs” I was intrigued enough to buy it, because I happen to LOVE Shawarma. In NYC we have quite a few Mediterranean style restos that sell it.
So I gave this a try and in short, not only did I like TJ’s Shawarma Chicken way more than I expected to, I liked it so much that since that first time, I’ve bought it over and over again. So if you don’t want to read this whole piece and just want to know if this is worth buying, the answer is a Yes. But if you want to know more, read on dear reader (including how to make a marinade so you can do these on your own for way less…. )
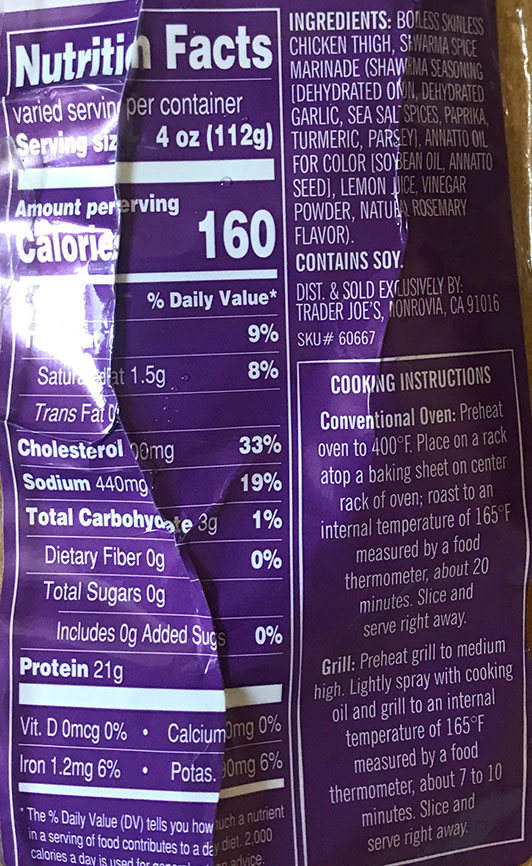
SHAWARMA CHICKEN THIGHS are flavorful having been deeply imbued from many “Shawarma spices” they use which include: “Onion, garlic, sea salt, cumin, cinnamon, coriander, paprika, turmeric, annato, parsley, lemon, vinegar, rosemary…”. This ready-to- cook chicken is convenient. Pretty much toss it into a pan. In less than 20 minutes you can have a tasty dinner ready with the addition of a few sides (Naan, maybe some rice/grains, veggies). The unopened package can easily stay a week or so in the fridge. They say way longer but personally I find TJ’s “good until” dates are way too generous. Naturally you can freeze it for longer than a week or two, and if you do, I suggest a slow 24hr defrost in the fridge.
Cut the bag open (carefully!) You’ll immediately smell the wonderful “Middle Eastern Shawarma” style spices (Be aware the Turmeric and Anatto in the marinade are natural dyes and can stain things easily, even a cutting board. If so use diluted bleach later to clean up).
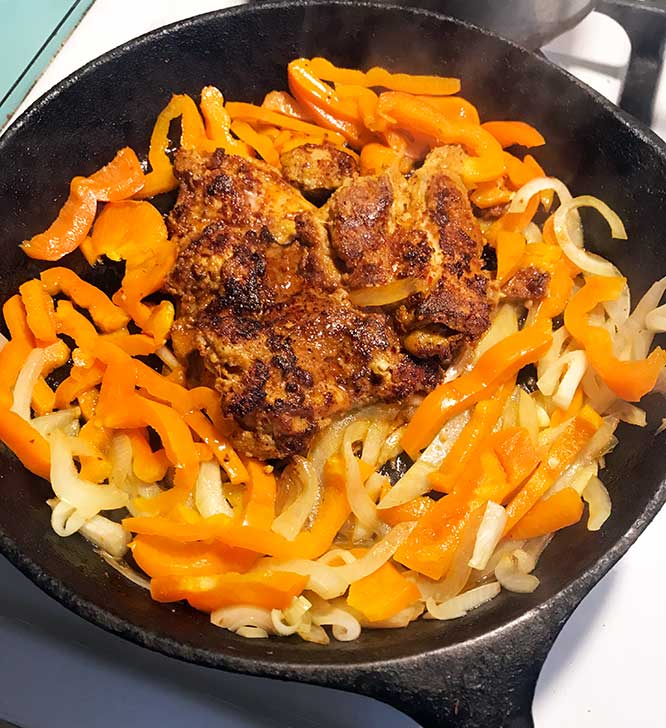
If there is any fat on the chicken, it will melt during cooking and it keeps the meat moist so I say don’t trim it off. I do make a few shallow slashes in the thickest parts of the thighs to help even out cooking with the thinnest part. Optional: blot the chicken with a paper towel to dry them a bit before adding to the pan. TIP: I actually sprinkle on more spices (Smoked Spanish Paprika, Ajika, another sprinkle of ground cumin, etc) as more dry spices on the surface will make it brown better).
Chicken cooked halfway, with added onion and garlic
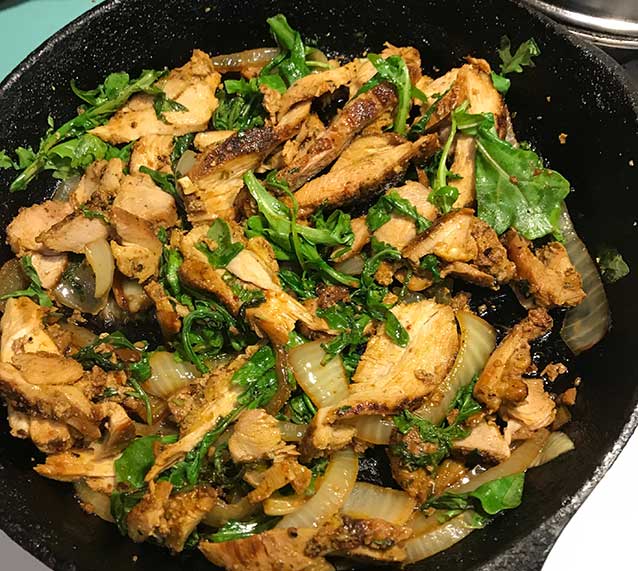
Cooked, sliced up and put back in the pan (with some arugula)
COOKING: I grill in a cast iron or non-stick pan. I add 1-2 teaspoons of olive oil (or better still, an oil/butter mix; the butter adds flavor and browns up well). Grill the the first side on medium heat for about 7-8 mins on the first side until deeply seared and browned. Turn and cook about another 6-7 minutes. Your kitchen will smell great cooking these from all those nice Middle Eastern spices. TIP: I let the thighs cook without touching or moving them until they get a good sear on them (see picture) Totally optional but adding sliced onion and garlic about half way during cooking will make for great additions (and possibly green/red/yellow peppers).
If you can grill these on a real grill with wood or charcoal of course and they would probably taste even better. Baking in the oven may work too for 20 minutes on high heat (450). You could even bake this as a Sheet Pan Supper with veggies for an easy one-pan dinner. Some people do these in an Air Fryer.
This marinade is not spicy so if you want a little heat just add something like Bomba or Zhoug goes especially well with these, with a bit brushed on at the very end and/or served on the side after cooking. Cooking veggies in the same pan on the side (onions, peppers, cherry tomatoes…) is good.
Pan grilling is my my preferred method as it browns great this way and seals in juices. The good thing about chicken thighs is they are way harder to overcook than breasts which as you know can dry out pretty easily (side note, I have a pretty foolproof method for cooking juicy boneless chicken breasts if you want to check that out here): (juicy chicken breasts).
Shawarma chicken, served on TJ’s Garlic Naan with Tzaziki, and veggies. Super yummy!!
When the thighs are done cooking, i would let them rest a few minutes before slicing (resting meat keeps in juices). Slice them however you like. One guy I saw online recommended cutting it into “french fries” size pieces. I put the sliced chicken back in the pan with the cutting board juices and mix it in with the grilled onions or veggies. Chopped fresh cilantro, parsley or arugula, is nice for some green color.
SHAWARMA SANDWICH ASSEMBLY – warm your naan or pita or tortilla. Place the sliced chicken down the center, top with sauce (TJ’s TZAZIKI sauce is perfect). Add a few veggies. To eat, you fold gently and eat it taco style. Or use knife and fork if you are fancy. Now no one says you must make it into a shawarma sandwich; you can just put the chicken on top of a salad or rice or noodles or what ever you wish.
As mentioned I find these go great with TJs’ “ZHOUG” spicy sauce which matches perfectly for a spicy Yemeni flavor. To tame the Zhoug you can mix Greek Yogurt and some Zhoug together 50/50 to make it less spicy. You can serve the chicken many ways but a great way of course is as SHAWARMA wrap with Naan or other flatbread. Use flatbread, warm pita or TANDOORI NAAN (it’s perfect for this) or even TJ HABANERO LIME TORTILLAS as a wrap …. add chopped veggies (tomato, cukes, shredded lettuce, scallion, parsley…) Top with sauce, a tahini or yogurt garlic sauce (TJ’s tzaziki sauce is perfect). These are messy to eat but oh so good. Your family will love them. Basmati Rice on the side, or as a bed, would be a great match with this.
Another Shawarma meal: this a DIY version from scratch on whole wheat pita bread with sauce and veggies
Shopping list : Shawarma Chicken, Tzatziki, Naan or Pita, onion, garlic, veggies…..
The second dish I made with these chicken thighs was to use them for Chicken Tacos / Fajitas. Despite the cultural melange (middle east/mexico) the chicken works great for Tacos or Fajitas. Sidenote: Of course you knew that Lebanese immigrants to Mexico had a big part in Mexican food culture and even created the famed Tacos Al Pastor! Green Dragon hot sauce with it’s tomatillo and cilantro flavor went really well and was perfectly Mexican on our chicken shawarma tacos.
(note: the price has gone up a few times since I wrote this!): TJ’s SHAWARMA CHICKEN THIGHS is $4.49 a pound* (currently 6.99) The 1.5 lb package I bought was just over $6 and I got two meals out of it, with sides, so more than if you just bought plain chicken but not a bad deal. (Sidenote: same package now costs $11!) The marinated chicken is great for cooking in other dishes. I made an Arroz Con Pollo kind of dish with the chicken thighs and it came out terrific! (brown the meat with onions, throw in rice, cover with chicken broth, cook 18 minutes…)
TJ’s SHAWARMA CHICKEN THIGHS are a good product and worth trying and these are a TJ hit. If you want to save money, naturally you could buy chicken thighs and add your own blend of “middle eastern style” spices for a marinade and let it marinate a few days in the fridge (see tips below how to make this yourself for less)
DIY SHAWARMA – IT’S CERTAINLY POSSIBLE TO MAKE THIS YOURSELF FOR LESS . Buy boneless skinless thighs. Marinate in with yogurt and shawarma spices (from 2 hours to up to 3 days in the fridge) “Middle Eastern spices” – Ground cumin, fresh and/or dried garlic, ginger, onion salt, turmeric, black pepper, Ajika, Zhoug, Hatch Flakes... Trust me, your own DIY marinated Shwarma style chicken will be really good and cost about 1/2 of the premade one!
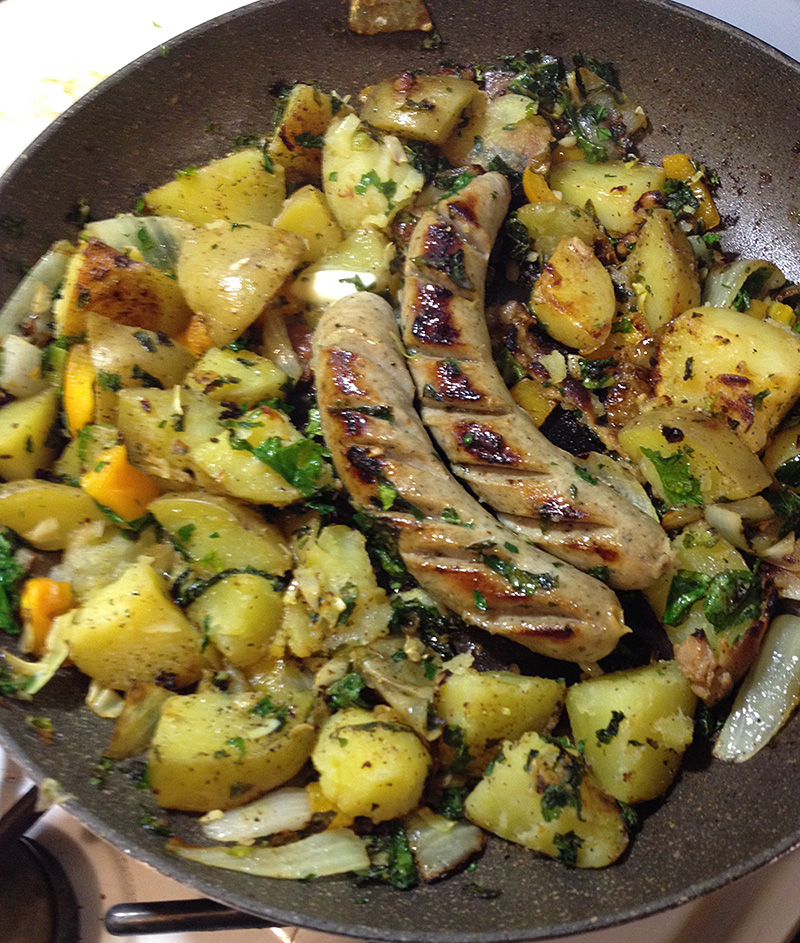
I saw this package of Trader Joe’s “BAVARIAN BRATWURST” sausages the other day, and they looked worth trying for review. They were indeed worth it. These are just terrific, an excellent product that I would gladly buy again. The sausages come fully cooked so they only need browning about 4 minutes per side. It’s labeled PRODUCT OF GERMANY as well as NO NITRATES OR NITRITES (ie, uncured) – two big pluses obviously. Originally for Oktoberfest and though they look a bit like “Weisswurst” (sausages made from veal) these delicious TJ “Bavarian Bratwurst” are made from only pork, water and spices… and we are talking an impressive variety of spices blended perfectly for a unique, great flavor. It’s these well-balanced spices and perfect texture which make these sausages quite different from say, the flavor of your typical American “Brats” or other sausages. The spices include: black pepper, marjoram, nutmeg, mace, ginger, coriander, and cardamon. Reading this spice list sounded to me like typical Christmas spices…. so I thought this could be a nice meal around Xmas time (or Oktoberfest for that matter!) But of course these are great any time of the year if you see them.
What I did with these was grill them up in a little butter with sautéed potatoes and onions. I served this classic combination with some really nice red cabbage in a jar (from Poland) I had just happened to find in a 99 cents store (!) Bratwurst and Potatoes are of course perfect together and and this actually became a Christmas Eve dinner along with the red cabbage and some nice German beers plus bread and veggies. Everything matched up perfectly for a small German-style mini feast (recipe below). But if you want easy peasy simple these also great just grilled and put on a hot dog bun, brioche bun, crusty roll or baguette with some good mustard and sauerkraut. Classic! These sausages make an easy meal. A 12 oz package with 4 good size sausages goe for $3.99 (ie, $1 each). So another pretty good deal from TJ’s and more than worth your trying. When I first saw these it was Xmas season and was not sure if they are available all year or if they’ seasonal (Update: TJ’s seems to carry these sausages all year!)
If you cooked these on a grill in summertime, it would be a huge hit I would think. You could try them with potatoes as I did or go the Easy Route, just brown them and serve them with mustard, kraut and some good bread or buns.
A NO-RECIPE RECIPE: Cut up some Yukon Gold potatoes into cubes and par-boil them for 5-10 minutes in salted water till almost tender but not completely cooked. Drain them and sauté them with some onions in oil (with a little butter for extra flavor). Cook on medium heat, toss occasionally until golden brown on all sides. Make room in the center and grill the Bavarian Bratwurst 4 mins per side until browned. I slash them slightly before grilling. When done serve with good mustard. Cold beer would of course not be amiss with these Bavarian Bratwursts!
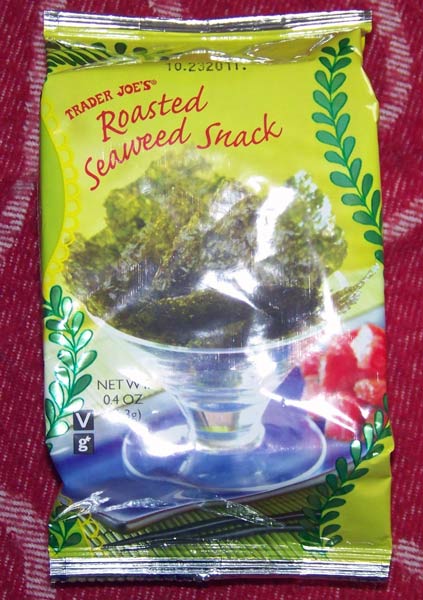
These are quite good. “Trader Joe’s Roasted Seaweed Snack” are made from seaweed, and are similar to, but slightly different from Japanese nori (seaweed dried into sheets).
These are “yaki-nori” (roasted nori sheets). These are from Korea. Korean ‘nori’ are made with sesame oil which gives the sheets a wonderful aroma and nutty taste and airy texture. They are more delicate and not as dense structurally as Japanese nori sheets, so can break apart easily. These are harder to roll stuff up in, for making sushi for example. But I do find the Korean kind tastier and in fact TJ’s “Roasted Seaweed Snacks” are delicious. Yes you can eat them as “snacks” as named, just pop them in your mouth. Eaten like this, a package will vanish FAST! They are addictive. However they are good any way you would employ nori. I have made sushi hand-rolls with them (very carefully so they don’t fall apart). You should try this; they’re terrific.
A pack of these goes for 99 cents (and yes I’ve seen better prices for similar ones at Korean supermarkets but you might not have one of those near you) Its still not a bad deal at all as they give you a good number of these small square sheets, which weigh almost nothing.
Now I have read this is a “polarizing Trader Joe’s product” meaning you either love it or hate it. Huh? Who hates these? Personally I love these and would say if you haven’t tried them, pick up a pack and check them out. They are a “healthy snack”. As with so many TJ items, you may be instantly hooked and grab them every time you see them (and no I don’t get paid for this folks, or get free samples. I wish!) My local TJ’s is actually putting them right by the Checkout line… next to the chocolates! That must mean something: checkout line item.
Do as the Japanese do: Try making thin strips of them to sprinkle on rice. Take 2 or 3 sheets. Using a scissors cut them into strips as thin as you can. Sprinkle strips on top of…. well almost anything. They will add interesting flavors to: rice, salads, fish, chicken, meats…experiment! Try wrapping some food in them too, instead of bread or a taco (maybe two together for added strength?) I love them with “Spicy Tuna” and some sushi style rice. Put a sheet in your hand, top with some rice and top that with some Spicy Tuna. Gently fold into a tube and pop that tasty morsel into you mouth. Yum Yum Yum!
I found a very good post about them on this blog; take a look.
If you are want more information including the Nutrional Info, I found TJ’s product description for them online (PDF) – turns out I was right about guessing Korean origin.
Here’s what TJ’s has to say:
THE ROASTED SEAWEED SNACK STORY
It all started under the sea with an edible red algae (genus Porphyra), which is now commonly known as nori. Around the 8th century, evidence of nori surfaced in Japan as a type of culinary paste. It wasn’t until the Edo period (1603-1868) that sheets of nori were invented through a method of paper-making. Skip forward a few hundred years, and nori becomes a sensation across the globe—for sushi, snacking and seasoning. So Trader Joe’s knows, it’s now or nori. Our Roasted Seaweed Snack features nori from Korea that is roasted with a touch of oil (sesame & canola) and sea salt, then cut into strips. That’s it. It’s light, crunchy, ocean-salty and nuanced with an intriguing nutty flavor. It’s so good, it proves hard to keep in stock. Especially at 99¢ for a package.
UPDATE!
PS – I found this and had to add it…. this is hysterical!
“Korean flavored nori is increasingly popular in Japan, also as a topping for white rice. You could also eat flavored nori just on its own, but you should resist the urge to do it when in polite company: eating flavored nori as a snack is considered fairly vulgar (which doesn’t mean people don’t do it!)”


Recent Comments