If you’ve been in a Trader Joe’s you’ve probably seen the word – ELOTE – a few times. One might even say TJ’s has a bit of an obsession with Elote. Just in case you don’t know what Elote means, “elote corn” is a typical Mexican street food consisting of corn on the cob sprinkled with cheese and lots of spices served carts by street vendors. In Mexico City there are probably as many Elote carts as in NYC we have hot dog carts.
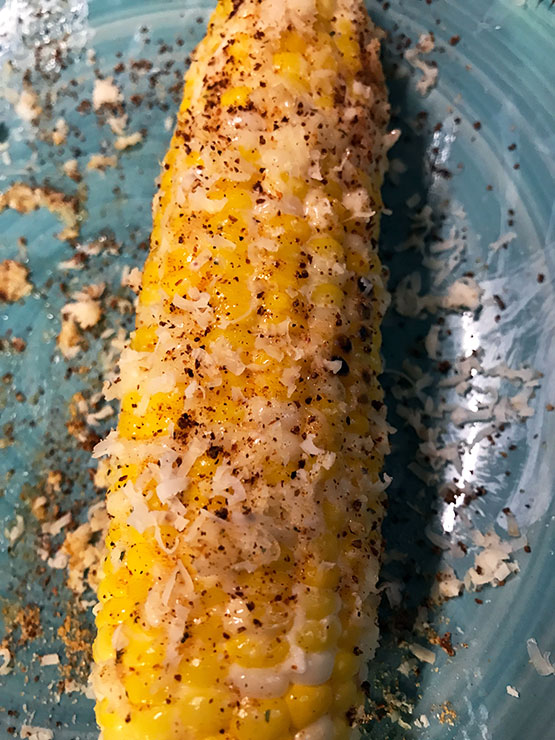
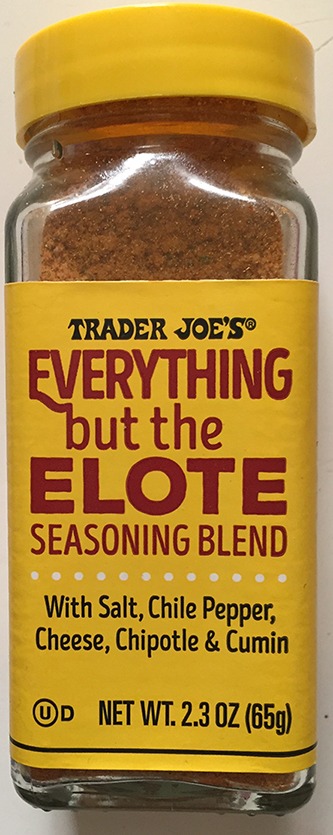
Elote corn is delicious, slathered with mayo, lime juice, dusted with chile powder and sprinkled with Mexican Cotija cheese. MEXICAN STREET CORN is not hard to make yourself, and conveniently, you can get everything you need at TJ’s. I just made some a few days ago with some really fresh corn and it was so yummy I thought I would share how to make it easily. You will need: Fresh corn on the cob, Everything but the ELOTE SEASONING, CHILE LIME seasoning, some mayonnaise, fresh lime, and Cotija cheese (like a Mexican parmesan). As far as mayo, TJ’s Chile Lime Mayo might work great or Suzi’s Organic Mayo.
If you can grill the corn, great, but steamed corn is fine. Cook corn. When done, hold it with tongs (or spear on a chopstick) or just put it on some foil. Slather some mayo all over with a spatula (mayo is authentic but if mayo turns you off, just use butter). Next sprinkle on a generous amount of Everything But The ELOTE Seasoning. Next sprinkle a good amount of grated COTIJA cheese (or Parm or Asiago). Squeeze some fresh lime juice on it. OPTIONALLY; if you want even more spice add TJ’s CHILE LIME Seasoning blend and/or a little hot sauce of your choosing. Now enjoy!
Now just in case you are a lazy bones and this sounds too complicated for you here’s a simpler version I do when I’m in a rush. Make your regular fresh buttered corn and just sprinkle a good amount of the EVERYTHING BUT ELOTE seasoning all over it. Easy enough?
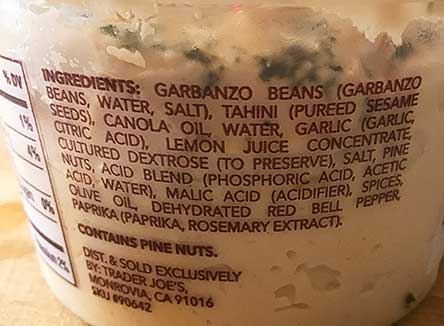
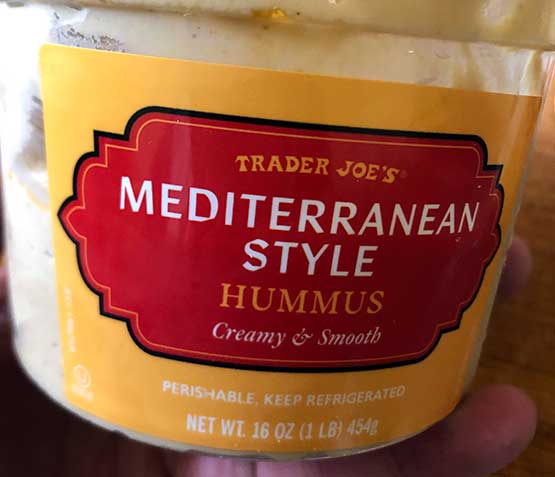
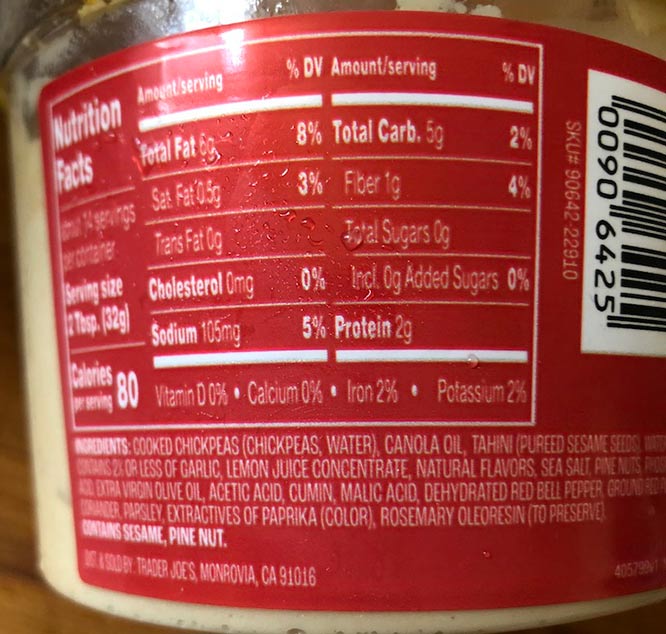
Trader Joe’s sells SO many varieties of hummus. I have gone back and forth with about three kinds there. I think this hummus is among their better ones, one reason being that this “Mediterranean Style” hummus has tahini among in the ingredients. Incredibly, at least to me, is that some versions of hummus on offer at Trader Joe’s do not have any Tahini in the ingredients. For allergy reasons perhaps for some customers?
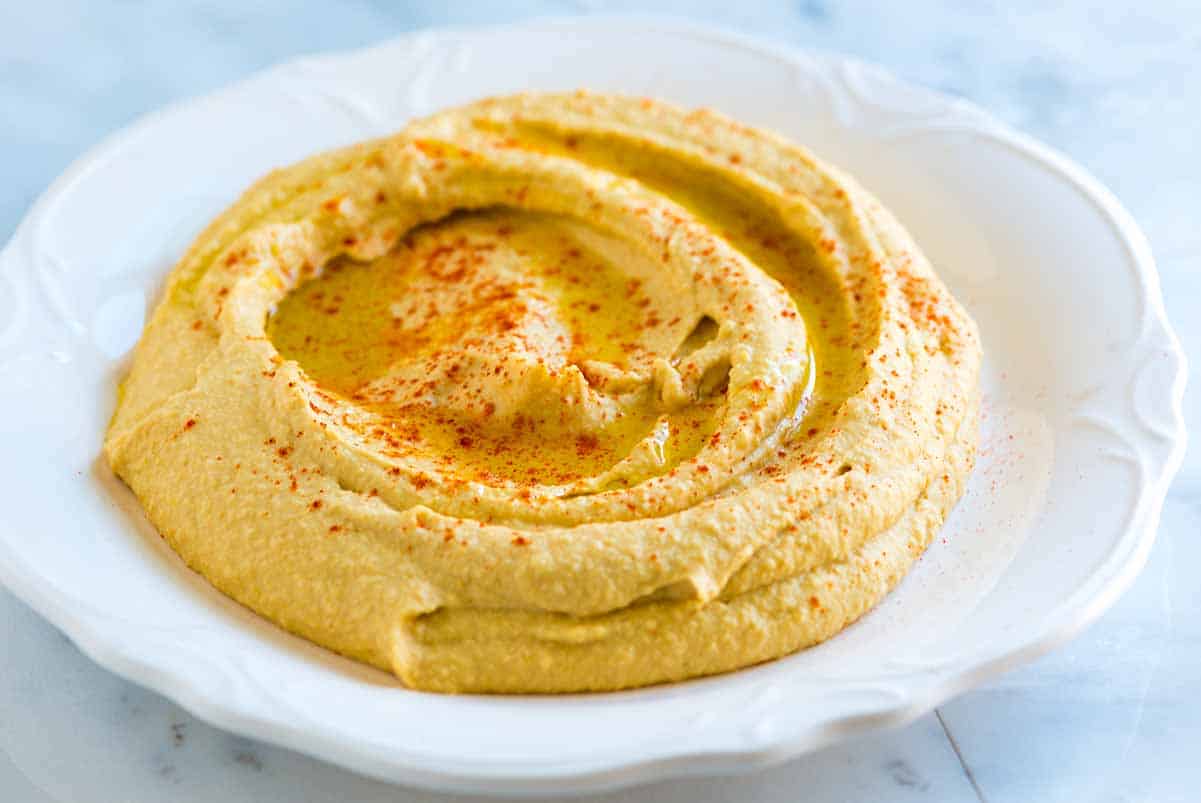
Tahini (ground sesame paste) is an integral part of a hummus recipe and it is partly why hummus tastes good, at least to yours truly. I love hummus made with a good amount of it. I can only imagine some people don’t like tahini or its calories? Or nut allergy? That must be why TJ sells hummus both ways, with or without it? Anyway their “Mediterranean Style” hummus is tasty. It is a little fancier as on top they have a few pine nuts and spices. This is one way hummus is normally presented in most countries. A squeeze of 1/4 fresh lemon juice would be good to add IMO . To serve hummus: Put in shallow bowl and flatten out as much as possible. Run your spoon to make a circular groove all around the hummus and add a pour of your best EVOO. Sprinkle a bit of spice (Ajika for example, or ground cumin or zaatar) all around the perimeter attractively. Voila!
Serve with warm pita or naan or other flatbread.
The Mediterranean Style hummus costs about $4 for a 16 oz tub (it’s 50 cents more then the regular one with no tahini). (Update: This went up a bit but is still their most reasonable hummus and one of the only ones to come in a 16 oz container.)
BTW, you can easily make hummus (which I occasionally do) Here’s are good recipes (best results will come from cooking dried chickpeas yourself not canned ones!)
“But what makes our traditional hummus different? First, consistency. Mediterranean Hummus is super smooth and creamy, a bit more “whipped” than many of our other hummus choices. The texture of hummus tends to be different depending on where in the world it originates, so it makes sense for us to offer some of that variety in our stores. We’ve also taken the liberty of topping Trader Joe’s Mediterranean Hummus with crunchy pine nuts, and a bright blend of parsley, red bell pepper, and olive oil which creates a distinctive flavor and texture profile we think you’ll really enjoy.” – Trader Joe
UPDATE SUMMER 2025: Trader Joe’s changed this product. It’s in a new package for one thing and for another thing it seems to have changed the ingredients in that new label has tahini as third ingredient listed after canola oil. It was previously listed as second ingredient. So there is less tahini now. I have been getting the ORGANIC HUMMUS (it does cost a bit more)
“We start with vine ripened tomatoes, then we fire roast them to a subtle smokiness before adding organic green chiles… They’re ready to use in salsas, sauces, soups and stews….”
Ingredients: Organic fire roasted tomatoes, organic tomato juice, organic green chili peppers, organic vinegar, sea salt, citric acid, calcium chloride”
These excellent organic diced tomatoes are a great pantry item, and in fact I always keep a few cans in mine as they are such a useful ingredient. They are indeed “fire roasted”, you can even see little bits of char and smell a little smokiness. You can use this as-is on tacos and quesadillas as a simple salsa, or make a slightly improved one quickly in seconds just by just adding a few things (ie, chopped onions, garlic, cilantro). Use this as an ingredient in sauces, stews or soup as you would any canned tomatoes, but these will be tastier than plain ones. These make the base of terrific rices dishes, say cooking some Mexican rice or what have you, mixed in for some of the stock or water. And its great for lots of other cuisines too… I made a delicious Italian Ariabiatta / Puttanesca style pasta with a can of this, olive oil, a spoon of tomato paste, lots of garlic, capers, olives, a spoon of Bomba and some grated Pecorino over the finished pasta (or try this with Gnocchi). It only took about 5 minutes to come together and the finished pasta dish with Gnocchi was delicious. We devoured it.
$1.69 for a 14.5 oz can. There is a plain only tomato version too for $1.49 if you don’t want any green chiles.
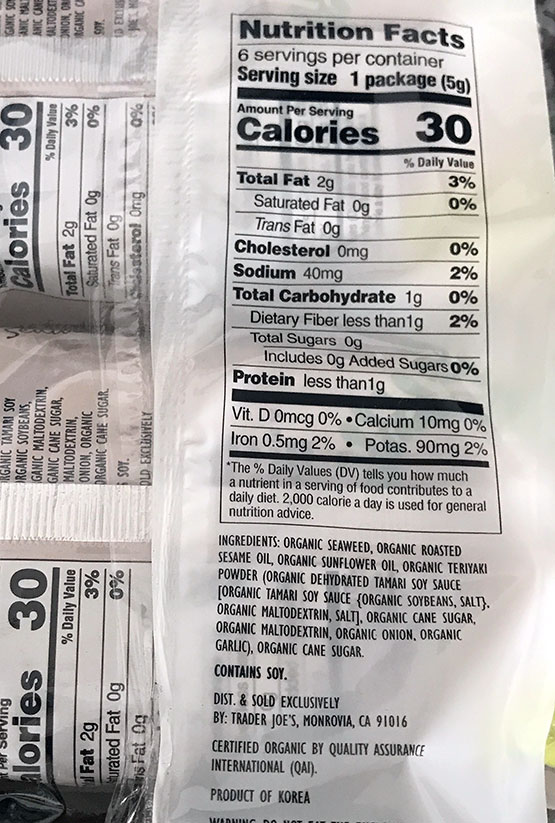
TJ’s Organic Roasted Teriyaki SEAWEED SHEET SNACKS (aka Korean Gim/Kim)
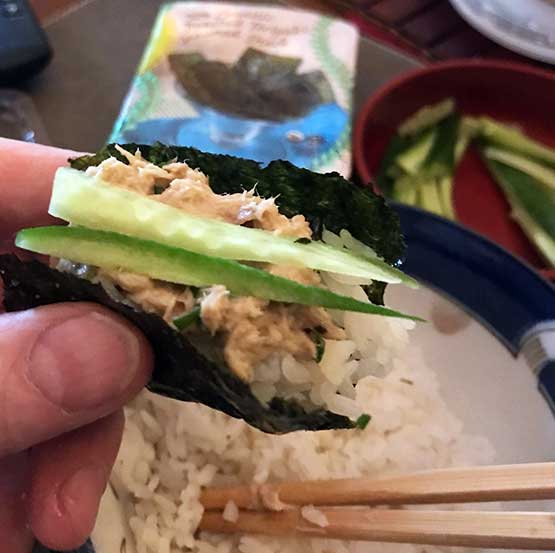
These are very similar to the single pack roasted Seaweed Snacks TJ carries. You know, the little green sheets of seaweed that American kids love! These however come in a convenient “six pack”. They are labeled Organic and “Product of Korea” and “teriyaki flavor”. Unlike Japanese nori seaweed sheets which are sturdy and solid (used in making sushi) these Korean seaweed mini sheets (aka Gim or Kim) have been roasted with sesame oil making the texture much airier and crumbly so they will break apart if you bend them too much. So while not great for rolling up as traditional sushi, I do use these to make a kind of “easy sushi” style mini hand roll. Putting a spoon of Asian rice in the middle, then something on top of that (especially good with Spicy Tuna*) and a few strips of cucumber. These are so tasty. You can hold the seaweed in one hand and add the other things carefully, bend it gently and pop it in your mouth in one or two bites. Quite yummy this combo! See pic and also Maangchi’s descriptive How To in the link.
$3.49 for a six pack. I have a feeling these may work out to be a bit more economical than the single packs?
TIP: snip a few sheets up into little thin strips for a super rice topping.
* EASY SPICY TUNA RECIPE (using canned tuna)
Drain the water or oil from a can or two of your favorite tuna fish. To the tuna, add 2 tablespoons of Mayo. Then add about a tablespoon (or two) of your favorite hot sauce of your choosing such as Sriracha, Zhoug, Peri-Peri or whatever you like, to taste (you can add more if its not spicy enough when you taste it with the rice). You might add a few chopped Hot and Sweet Jalapenos to the mix. Add a chopped scallion or two, mix everything together, and refrigerate for an hour to blend the flavors. Serve with cooked Asian rice and these Seaweed Sheets.
HOW TO MAKE EASY SUSHI MINI HAND ROLLS: Hold a sheet of seaweed gently. With your free hand, put a teaspoon or two of cooked rice on it gently and make a slight indentation for the tuna topping. Add some spicy tuna and strips of cucumber. Not too much in one square or it may fall apart, just enough for a nice big bite. Put in to your mouth carefully!
You can also the tuna just putting some a spoon on top of asian rice in a bowl. You put a little tuna, a crunch of cuke, and then cover that with a square of seaweed. Carefully “fold it” (bend gently) into a little package using chopsticks (or your fingers).
Naturally you can use other toppings. Smoked salmon and avocado is a classic too.
Serving these with some Kimchi on the side would be great.
For years I have bemoaned the fact that Trader Joe’s carried a number of types of long grain rice – Thai Jasmine, Indian Basmati – which are all terrific. However the one thing TJ’s didn’t carry (until now) was short grain (aka “Asian”) rice. Well finally they do! OK technically Trader Joe’s Calrose rice is a “medium grain” rice however the reality is it’s an Asian type rice, grown in California. Seeing this Calrose rice for the first time made me so happy as it meant I no longer have to trek for rice at H-Mart or other Asian supermarkets, lugging a 20 lb bag of short grain rice back on the subway!
So what is CalRose rice exactly? (Cal as in California). See the link below for complete info.
Maybe you have seen Kokuho Rose rice, or Nishiki? Both are brands of Calrose rice grown in California for the U.S. Asian rice market. Nishiki is an especially popular brand among Japanese people in the US.
One thing I need to point out however are the directions written on this package need some adjustment. I think TJ’s directions saying “simmer for 30 minutes” is crazy and wrong: cook rice for 30 minutes!?! That’s about twice as long as one normally cooks white rice. If you follow the instructions written on the package I think you will end up with overcooked, mushy rice. See my correct instructions below:
HOW TO COOK CALROSE RICE (on stove top). You need a heavy pan with a tight fitting lid. Wash 1 cup rice gently in one or two changes of water. Drain the rice 15 minutes in a colander. Put drained rice in the pan with 1 1/4 cups of water (ie, a little over 1-1 ratio) with a little salt*. Cover and cook on med. high heat. Set timer for 10 minutes. After 10 minutes check rice quickly. You should see most if not all of the water gone and a few holes in the rice. Turn heat to lowest setting and cook covered for another 6-7 minutes. After this time, just turn off heat. Don’t open the lid! Leave rice covered 10 minutes. It should be perfectly cooked. You can fluff it a bit with fork or chopsticks. Taste it. If you really think its not done put on low heat for another 4 minutes with a teaspoon of water added. (*I add a little bit of salt to rice however my wife (Japanese/Korean) never adds salt.)
Of course short/med. grain rice is naturally stickier than long grain rice, for one thing making it easier to eat it with chopsticks.
spicy tuna hand rolls
Oh and by the way this Calrose rice is not only for Asian dishes but excellent for other dishes, like Spanish rice dishes calling for medium grain rice, such as paella. You might even try doing a risotto with this TJ rice.
Trader Joe’s Calrose Medium Grain rice sells for $2.49 (2 lb bag ie, 1.25/lb) A typical price these days as rice has gone up in price a lot since a few years ago.
Can you make sushi with this? Yes! Or here’s something way easier than real sushi – serve this rice with Spicy Tuna (with mayo and Sriracha) and sheets of Nori (TJ’s roasted seaweed snacks) and slivers of cucumber for an easy sushi style hand roll. Need a recipe for Spicy Tuna? Here you go!
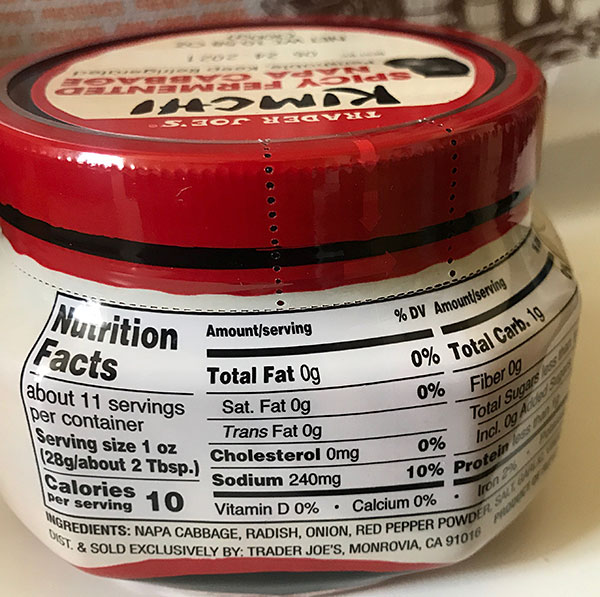
Rated “While not anywhere equal to kimchi you would get at a Korean supermarket it’s OK in a pinch, especially for cooking with, and it’s pretty cheap for kimchi!”
(Review Update: I tried it again (Dec 2023). I found it improved. TJ’s kimchi has gotten a little better since I first wrote this review. While still not top notch kimchi, it’s not bad – especially factoring in the price which you can not beat)
Yogurt, kefir, sauerkraut and kimchi are all fermented foods with probiotic benefits. So in addition to being being tasty as side dish or an ingredient, kimchi is a healthy food teaming with probiotics and worth adding to your diet.
My wife is Korean/Japanese. We try to always have some kimchi in our fridge. Personally I love me some kimchi. I like it so much, during Covid I even tried my hand at making it myself (and actually it turned out great.)
From my wife and my in-laws I’ve learned to tell what’s good kimchi. My wife says Trader Joe’s is “just OK”. She will eat it if its the only kind we have in the house but she much prefers to buy kimchi at H-Mart. So lets’ get this out of the way immediately. Their kimchi is way better than Trader Joe’s. It cost more though.
I can tell you the kimchi from HMart is great. It was no doubt made locally, and trucked in which probably took no more than one or two hours. In contrast, Trader Joe’s kimchi is Made in Korea. Which sounds good but think about how is it shipped to the U.S. By Air or Sea?. I’m guessing with the time to get it to the U.S, its taken some time and fermented more which is OK for Kimchi if you want it a bit aged. It just may not be as fresh a kimchi as you might buy H-Mart (when you open a jar of that, you can tell it’s pretty new-ish as the HMart one has a a firm crunchy texture and bright color. If you check out this site, it has pictures of Kimchi over time, from one day old to fifty days old; you will really see what happens to it. Compare the “Day 50” to “Day 1” kimchi to see what occurs as it ferments more.
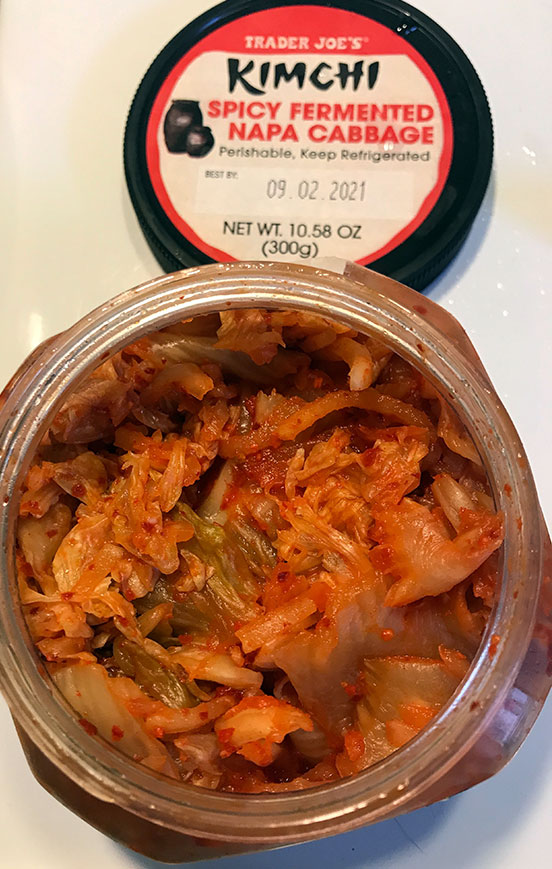
With this Trader Joe’s kimchi, the texture of the napa cabbage is a bit soft, the green quite faded.Kimchi is a “living” food that continues to ferment, even in the fridge which slows down but does not stop fermentation.
My wife and I think in a pinch a jar of Trader Joe’s kimchi is OK. As we like having some kimchi in the house we say “it’s better than no kimchi”. Generally what we do with TJ’s kimchi is use it for cooking and kind of think that’s what you should too – but of course you can just eat it as-is. Just realize this kimchi is nowhere as good as say the excellent Tobagi brand kimchi one can buy at H-Mart. However that stuff is now crazy expensive! This kimchi is a bargain comparitively.
In the past in Korea, kimchi was almost typically all home made, though modern Korean families mostly buy it these days, unless Mom or Grandma makes it. In Korea of course one can buy very good commercially made, very fresh kimchi. Here in the US you can find good kimchi at Asian markets for example H-Mart. Kimchi is tricky to distribute because it is alive and highly perishable. It keeps fermenting. We once bought a jar at Whole Foods of a crazy expensive, “Mother In Law’s Kimchi”. When we opened it up, the kimchi exploded out of the jar like a shook-up can of Coke! Jeez, it had really fermented and built up pressure. It made an enormous mess of our entire kitchen and took us about an hour to clean up. On top of which we didn’t find it at all worth the high price ($14?) at Whole Foods.
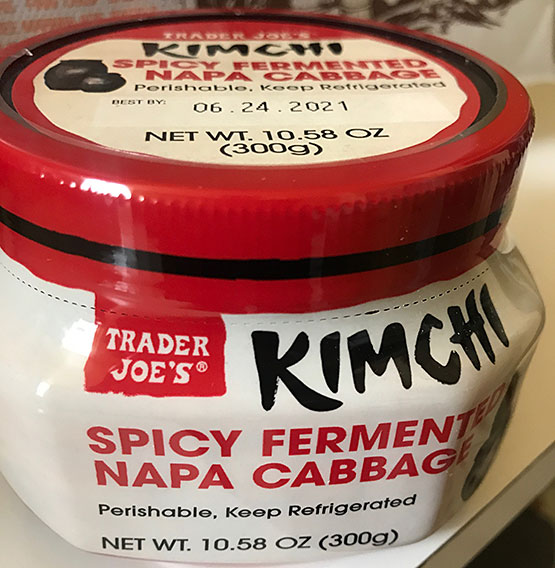
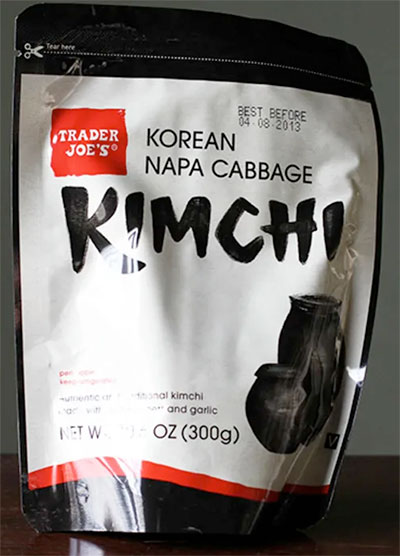
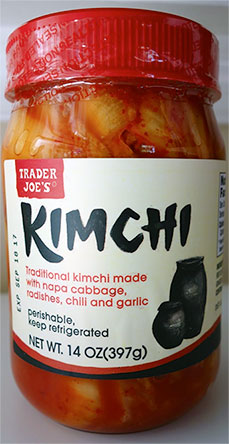
Historically Trader Joe’s has tried their hand selling Kimchi a few times, in different packages (see above). Over the last few years, I would notice some kimchi at Trader Joe’s but it changed or vanished? Either they discontinued it for a spell or maybe they were finding other vendors, changing the packaging, or all of the above. Before TJ’s current version sold in this red plastic jar, they sold kimchi in a plastic pouch (see link) and then in a glass jar. This current version is the third incarnation/package I can recall. I have never been too impressed with TJ’s Kimchi usually giving it a “well its OK”. My short review of this TJ’s latest kimchi attempt remains that: “well it’s OK”. Let’s face it, this kimchi was shipped (by air?) all the way from Korea, probably landed in California, then it has to be distributed by truck all over the US.
In reality TJ’s kimchi is nowhere near to a kimchi you will find at almost any Asian market, like H-MART (wow, see how many kinds H-MART has?!) If you have the chance to buy some at an Asian market, that would be a good base line to compare this to.
On the plus side Trader Joe’s Spicy Fermented Napa Cabbage Kimchi does have a tangy fermented taste (from lactic acid, which interestingly is even listed as an ingredient?) It doesn’t list any fish products (oysters, squid, or fish sauce) for more Umami like many top brands have, meaning TJ’s kimchi is VEGETARIAN/VEGAN. Is it “Spicy” ? I don’t find it spicy at all, like most kimchi is, though I imagine this is a highly personal taste. Trader Joe’s kimchi is kind of already what I would call just a shade “old” meaning it’s like a Korean supermarket kimchi that we bought say 2-3 weeks ago that had now become more fermented as it sits in our fridge. As kimchi ages and ferments more the taste gets a little more sour, it gets softer, and the green color fades a bit. What we do at this point is we say let’s make something with it. Use it to cook in a dish, for example to make a kimchi fried rice, or maybe “Soon Dubu” (kimchi tofu stew) or Kimchi Pork (Buta Kimchi).
I’m glad TJ’s is at least selling Kimchi and Korean foods like the TTeok Bok Ki. And Jap Chae (both are not bad) or the Korean rice cakes.
So to sum up if you can’t get a really good Kimchi from a Korean store, Trader Joe’s kimchi will do in a pinch. It’s price is amazing (still $4 in 2023) – kimchi in Asian supermarkets has gone up so much, its crazy expensive.
Try TJ’s kimchi with your Pot Stickers. I say cook with it, certainly use this with some leftover rice for some kimchi fried rice, with a fried egg on top. Some more ideas to use the TJ’s kimchi in dishes:
You could make a Kimchi Jigae (kimchi stew) with tofu and kimchi and pork. Tip: TJ’s pork tenderloin is good for this.
This is a very good Kimchi (TOBAGI sliced cabbage kimchi). Bon Appetit reviewed a bunch of kimchi brands and Tobagi was one of them. Its available at HMart if you can get to one; try some really good kimchi and you will understand the difference
DIY Kimchi! No, seriously! I’ve made kimchi. Its good. There are easy kimchi versions that are not terribly hard to make. If you buy a few ingredients at a Korean market you can make your own kimchi and I bet the result will be better than TJ’s kimchi not too mention you will feel like a star when you impress people casually tossing out “You like this kimchi? I made it myself”. Aaron & Claire on YouTube have a great “easy kimchi” recipe using regular cabbage (it’s a kind of “summer kimchi”). I made it and my (Korean-Japanese) wife who has always said the TJ kimchi is at best “meh” told me the cabbage kimchi I made based on Aaron & Claire’s recipe was the best kimchi she had in the U.S. (she was just so impressed this white guy – me – made some good kimchi)
Seriously, if you want a good kimchi, you will be surprised that you can make kimchi yourself. Thanks, Aaron & Claire for a super recipe, and you will find lots of other ones on Youtube and online. I’ve learned so much watching Aaron cook.
You can find toasted Sesame Oil at Trader Joe’s as well as GOCHUJANG (red chili paste) It’s a must have ingredient to do Korean cooking. As well as Korean Red Pepper Flakes (Gochugaru) – needed for making kimchi
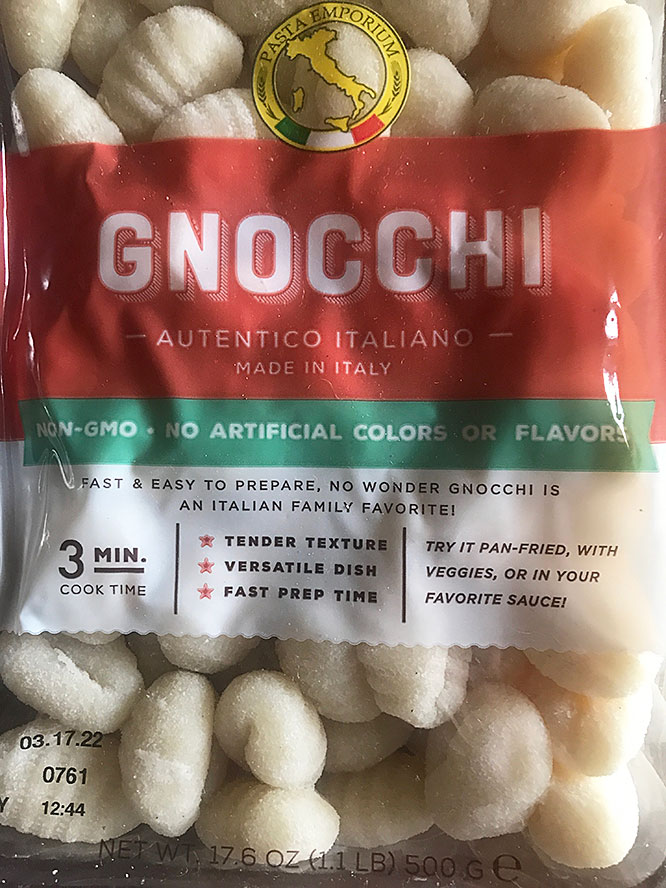
TJ’s Pasta Emporium Gnocchi. “Autentico Italiano”.Made in Italy.Shelf stable package.
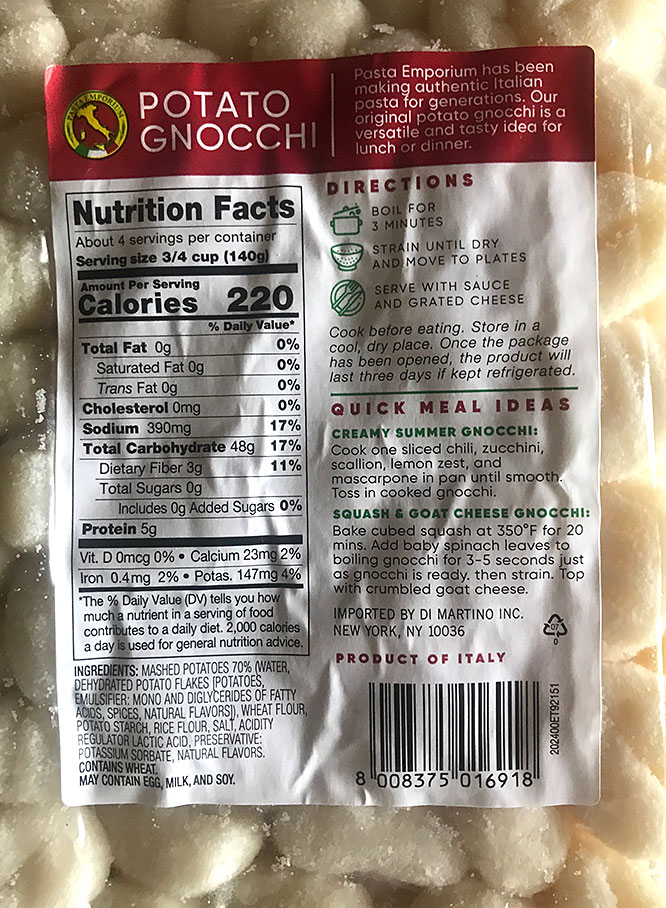
These gnocchi are one of my favorite TJ items. They are so handy. I almost always pick up a pack every time I go so I have one in the pantry. Available in the pasta section, these packages of TJ’s POTATO GNOCCHI are terrific and a bargain at just $1.69 (1.1 lbs). The package is shelf stable and can last months in your pantry (you could store them in your fridge if you like but you don’t have to). I probably usually use them within about 1-3 months? The cooked gnocchi have a pleasantly chewy texture, which you can accentuate even more by pan frying them (see below), one way I recommend cooking them.
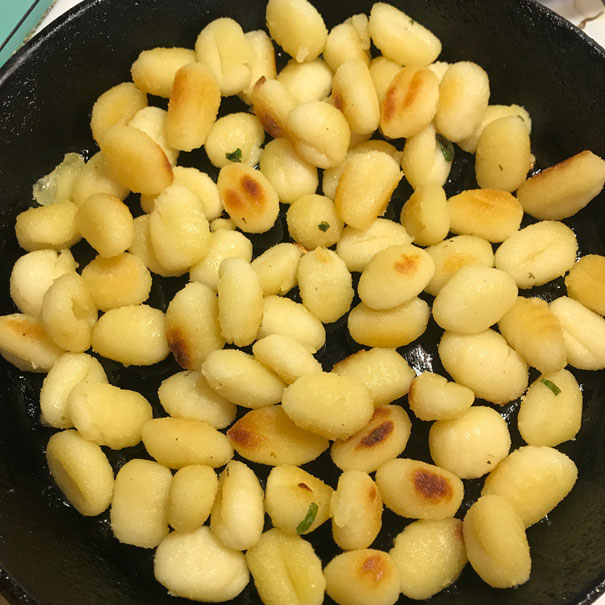
COOKING: Simply toss these into boiling salted water for about 3 minutes and they’re ready to serve with your favorite sauce. They will float to the top of the water when done. Perhaps even better I’ve found is one can boil them for 1 minute, drain, them throw them in a non-stick or cast iron pan with 2 tablespoons of EVOO to pan fry them until they are golden brown. The crispier texture from this is terrific. Actually an even easier way which I discovered and clearly others have figured out too, is you don’t even have to boil them at all. You can just pan fry them without the boiling. The even chewier crispy texture is great.
PAN FRIED GNOCCHI: Just toss these gnocchi right into a pan with 1-2 tbl. of olive oil and pan fry them until browned on all sides, stirring occasionally. I do a variation on this. I put 2 tbls of EVOO (or even nicer, a mix of half oil and half butter) in a black cast iron (or nonstick pan). Get the oil hot on med. heat until it shimmers. Toss in these gnocchi and stir till coated. COVER THE PAN. Cook covered 5-8 minutes, stirring occasionally. They kind of pan fry & steam at the same time for the best of both worlds. After 5 minutes or so, take off the cover and continue pan-frying till GDB (Golden Brown and Delicious) maybe another 5-10 minutes.
What to serve with them for a sauce? Almost anything you can think of which you would do for pasta. Of course great with with your favorite TJ tomato or marinara sauce. TJ’s jarred Pesto works quite well with these. It can even be as simple as just butter and grated cheese plus some black pepper, a kind of Cacio E Pepe. Speaking of which – In TJ’s C&P sauce! Or get inventive. In the photos below you will see I cooked them with greens (swiss chard but you can use any greens like kale, spinach, arugula…) I used lots of garlic and lots of grated Rosemary Asiago *. The gnocchi were delicious with greens. Of course any Italian cheese works Parmigiano, Pecorino, Asiago) even some Mozz cut into cubes to melt in. I had these last week with some leftover Bolognese sauce I had in the freezer and they were simply amazing with Bolognese sauce. TJ’s even has a vegan bolognese sauce.
Are these better than the frozen Kale and other Gnocchi? For me actually they kind of are and frankly these are half the price of the frozen gnocchi which I feel don’t have the same textural integrity when cooked this way (pan fried) though I could experiment some more.
Anyway if you never tried these packaged Gnocchi, check them out. I can’t tell you how many times when we “had nothing in the house to eat” I found we had a package of these in the pantry and then had a dinner ready in 20 minutes for a few dollars.
Pan fried Gnocchi with Swiss Chard and Asiago
*RECIPE : PAN FRIED GNOCCHI with Swiss Chard & Rosemary Asiago Cheese – Separate leaves and stems from Swiss Chard. Cook the cut stems with 3 cloves of garlic smashed until tender in olive oil. Remove greens from pan then into same pan, toss in a pack of gnocchi with a tablespoon of EVOO and 1 tbl butter. Cook covered as discussed above till browned all over. Now add back the swiss chard plus chopped up leaves. Cook and toss around in pan till leaves are cooked till your liking. Toss in some chopped parsley or arugula. Season to taste with a little salt, sprinkle of lemon juice and lots of black pepper (optionally – a spoon of BOMBA) Grate a few ounces of Asiago, Pecorino or Parmigiano over all and drizzle with good EVOO. Serve 2 as dinner or 4 as a side.
(Can substitute Kale, Arugula, Spinach or any green)
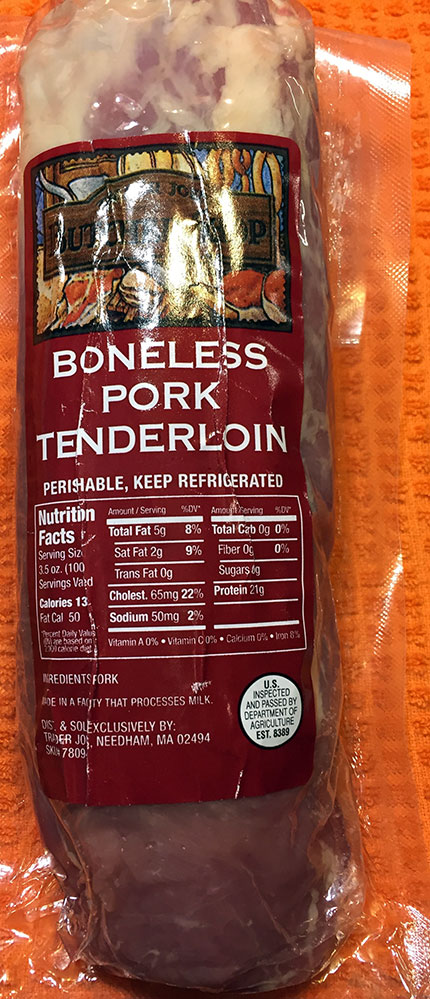
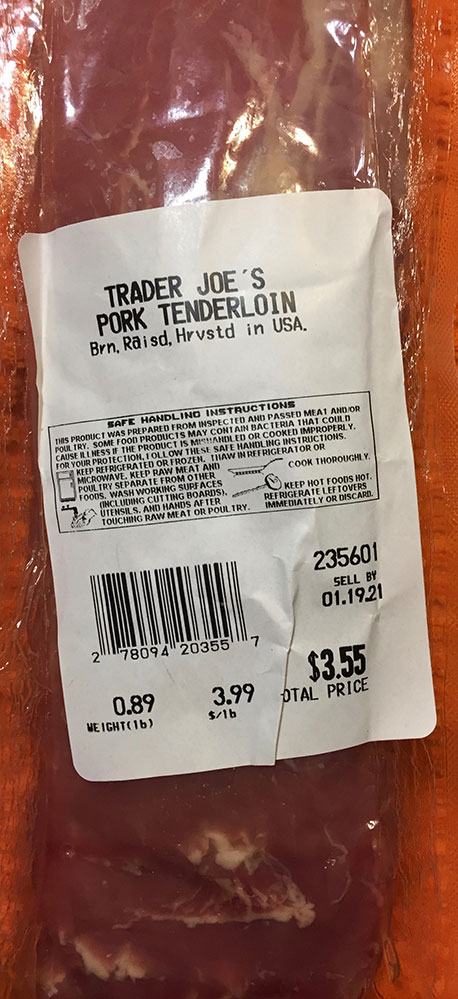
Another one of those things that I get almost every time I go to Trader Joe’s as it’s delicious and an extremely versatile thing to have in the fridge (or freezer) and a pretty good deal.
If you are not familiar with “pork tenderloin” let’s put it this way… If this was beef it would be the filet mignon. The best melt-in-your-mouth deliciously tender cut. One big difference? Beef filet mignon costs about $15-20/lb or more? But this “pork filet mignon” sells for $4/lb at Trader Joe’s. A $5 piece can feed a family. So deliciously tasty as well as super affordable.
(UPDATE: Price has increased since this was written)
Trader Joe’s sells 4 versions of the pork tenderloin. “Plain”, 2 marinated ones (peppercorns and garlic & herbs) that cost more – come on it’s so easy to do a marinade of your own in a few minutes. TJ also sells a “crate free” pork tenderloin if you prefer which is $6/lb. more expensive. At Whole Foods I’m just guessing this would cost double that price?
Boneless pork tenderloin is a lean cut with almost zero waste. It can has a “silverskin” which should be removed. This is not very hard, you just need a sharp knife.
I frequently just cut the tenderloin into “medallions” or steaks about 1/2-3/4 ” thick, season them, and cook them as one might cook filet mignon. Or one can cook it whole in a pan, then slice it afterwards (deglazing the pan after for a pan sauce). Cut the meat into strips, and this is so perfect for Asian dishes & stir-fry’s. Or Fajitas or Tacos! Whole, its great for roasting in the oven. Pork tenderloin can be an impressive center-piece of a fancy dinner (See the stuffed roast pork tenderloin video recipe below) Another tip: Be sure not to overcook tenderloin, as it’s so lean it can easily get overcooked and dried out. A correct cook of tenderloin should have a bit of pink (trust me, it’s safe and fine) TIP: Slice slits in the meat and insert thin slices of garlic all over.
Seasonings for pork tenderloin? You can not go wrong with any of these: garlic, lemon, rosemary, cumin, peppercorns…. and AJIKA!
TIP for Asian stir frying: The Chinese technique of Velveting any meat for 20 minutes will make it even better.
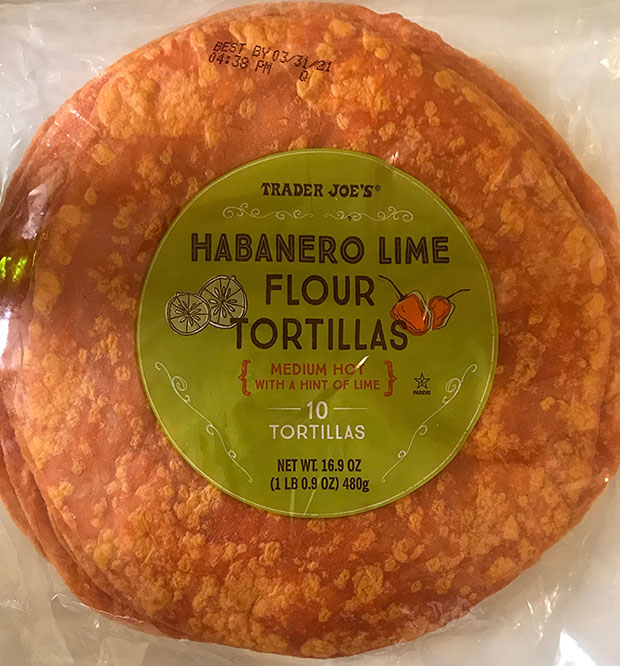
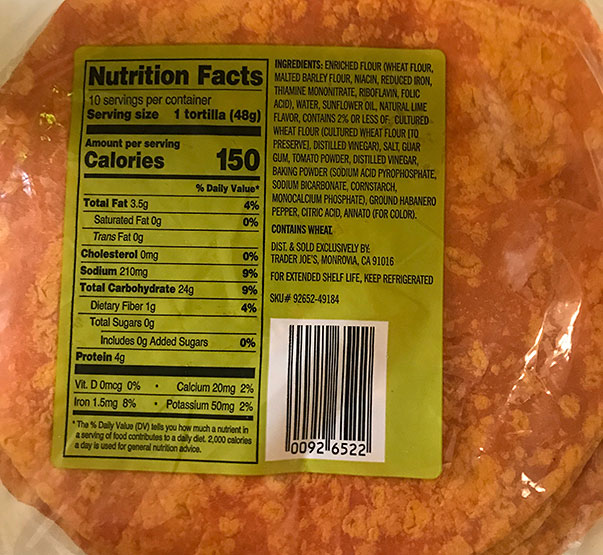
Trader Joe’s HABANERO LIME FLOUR TORTILLAS ($2.69, 17 oz package of 10)
Some countries have regional food “divides”. For example traditionally in Mexico in the North they lean towards using flour tortillas (Tortillas de Harina) while in Southern Mexico mostly they prefer corn (Tortillas de maiz). I generally prefer corn tortillas as they’re more flavorful and have a chewier texture especially when cooked. Still sometimes I buy flour tortillas as they have certain qualities that make them useful for some things. For one, flour tortillas are softer and more pliable so easier to fold. They are usually bigger too so can hold more ingredients inside which is why they are used for burritos. They can also be used for sandwich “wraps” too. Trader Joe’s HABANERO LIME FLOUR TORTILLAS are an interesting choice as they bring a bit of flavor to the tortilla. These have a little bit of heat in them from habanero chiles, plus a bit of lime flavor. They have a lovely color, tinted reddish orange from anatto seed (a natural food coloring). Package says “MEDIUM HOT” but remember when you add fillings that moderates the spicy level.
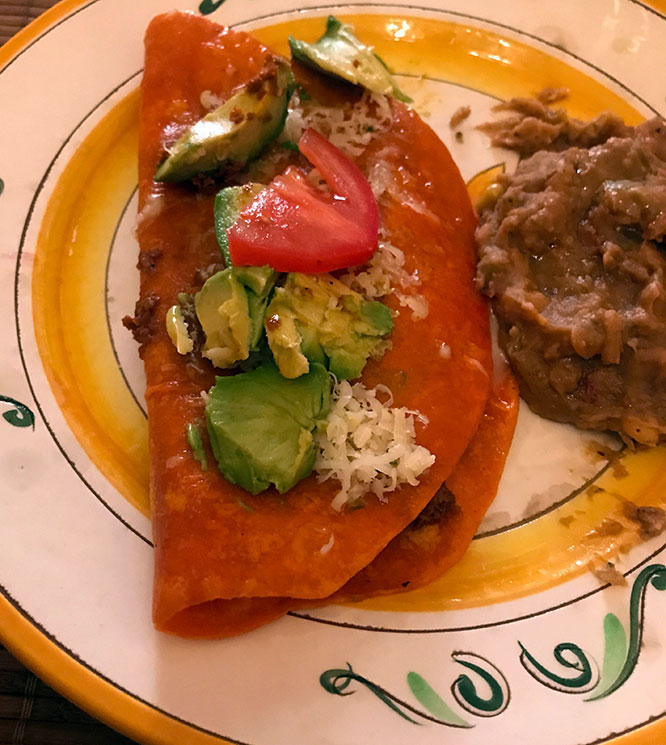
Last night, I made Quesadillas (vegetarian actually) for dinner with these Habanero/Lime tortillas. Filling was: Pepper Jack Cheese, Soy Chorizo and TJ’s Refried Salsa Pinto Beans (which I gussied up*). Topping of avocado, tomato, more cheese and Green Dragon Sauce… More Refritos on the side…. They were really tasty!
TIP – Out of the can, TJ’s Salsa Pinto Refried Beans are really boring. They need a little work if you want them to have some taste. I add olive oil, oregano, cumin, chile powder and a little Green Dragon or Zhoug. Cuban Style Spice Blend works great with these or any beans. Warm frijole refritos over low heat, stirring often so the bottom doesnt burn. Some cheese on top is nice!
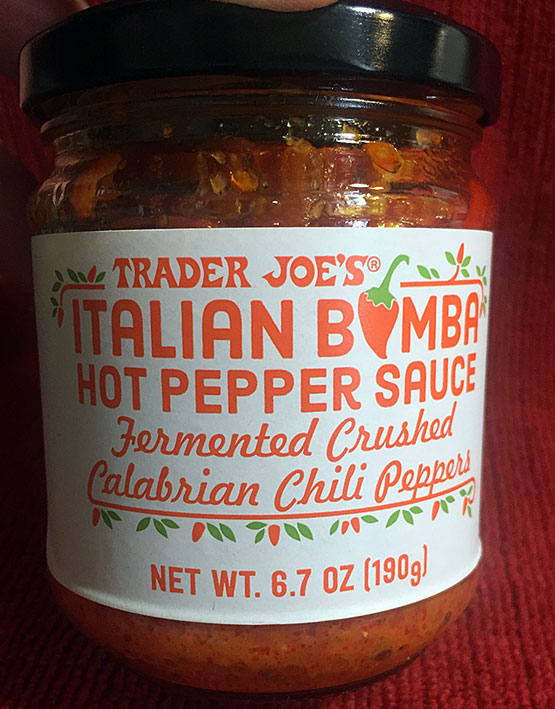
Since it first appeared, Trader Joe’s Italian “Bomba” Hot Pepper Sauce blew up all over the internet as one of Trader Joe’s best new offerings. In this case, any hype you’ve heard about how good TJ’s “BOMBA” is, is 100% justified. This stuff is incredible. Sorry I won’t be saying “it’s the bomb” (even though it is). However I will tell you that we just freaking LOVE this stuff, and put it on many, many things. Since first trying this its become a condiment that we have to have in the fridge at all times. Here’s why.
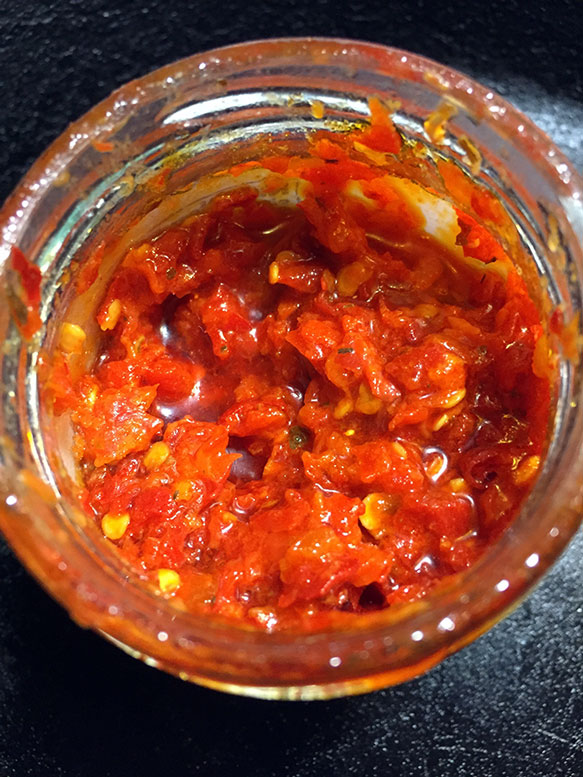
BOMBA is a condiment made from crushed up fresh Calabrian red chile peppers that get fermented. By now I’m sure you’re well aware about how fermentation adds complex flavor elements to foods. When you taste this paste you will notice a little bit of funkiness. That is it’s fermentation and it adds a magical addition of, you guessed it, UMAMI. Giving this stuff more complexity than just a “hot sauce”. Now Bomba sauce is a bit spicy but it’s not really spicy. It’s nowhere near a knock-your-head-off hot sauce, skulls on the label, kind of spicy. This has a tolerable level of spicy PLUS flavor! As a spiciness test, I just put a small spoon of Bomba in my mouth. While I got “yes this is spicy”, it didn’t want to make me want to drink a glass of milk or anything. I got something beyond just “spicy”, there that funkiness, even a bit of sweetness. So depending on the amount you use, you can adjust the level of spicy to your taste and palate, and if you add even just a tiny bit to dishes – I’m talking a quarter of a teaspoon – it will add wonderful flavors that may surprise you.
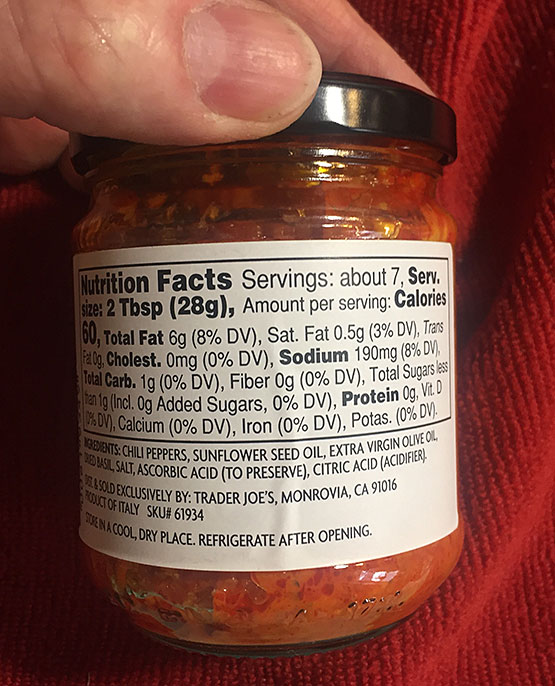
How to use Bomba ? Of course this is going to be great added to tomato sauces, say on pasta or pizza or what have you. But what about other pasta dishes? A spoonful mixed into your Spaghetti Aglio e Olio? For sure! A little bit in your Carbonara? Controversial perhaps but I do it, and it is terrific. What about all those Gnocchi you love from Trader Joe’s? Regular, cauliflower, kale, shelf stable or what have you… OMG folks, a dollop of this Bomba with garlic and good olive oil will make your gnocchi soar. Still, Bomba is more than “just for Italian” food. I put a little bit into my scrambled eggs. It’s divine with eggs of any kind. A drop of it onto of my buttered, toasted baguette is great. A little bit mixed into avocado toast or guacamole. Add a little bit of Bomba to your marinade for meat or chicken. Dips and sauces? Perfect. You can mix this up with some Greek yogurt (or mayonnaise for that matter) for an instant wonderful sauce, to top some cooked Chicken Breasts, Shrimp, or Tofu as well. Or try that mix as a dip for some chips. Drizzle some with olive oil and garlic on your roasted veggies. Add a spoon of this to your soup or most any sauce to give it some jazz. I even love it on cottage cheese on toast (no, seriously that’s really good). On my sardines on toast. I suggest adding some fresh garlic when using Bomba. Of course these two go very well together. Asian food?! OMG yes, yes, yes! Honestly the list of things and types of food Bomba can improve and go with is endless and I promise, you will discover uses on your own (please share some with us in the COMMENTS below). TJ’s Bomba is truly a premium gourmet offering. Amazingly Trader Joe’s sells this for $2.99 a jar, which is honestly incredible for such a product. Oh and it’s really Italian, it is a “Product Of Italy”. I have found it sold out on occasion as its a big hit. So if you like it, next time grab an extra jar to keep in the pantry like I do (but just one, leave some for me, and the next guy!) Ingredients are: Chilies, Sunflower Oil, Olive Oil, Basil, Salt, Ascorbic Acid, Citric Acid. Honestly even if you are not really the “hot sauce type” I suggest you get a jar of this to try. Calabrian chili’s are not super hot; they are in the “medium” spice level. People can pop them in their mouths easily. Personally I can’t live without having a jar of Bomba in the fridge now and if you try this, you may feel exactly the same.
TIP: I add a bit of Extra Virgin Olive Oil after I open the jar to “seal the top” off from air and keep it freshest for longer. Keep the jar in the fridge. Take it out 15 minutes before using if its congealed.
If you tried BOMBA and have any Comments feel free to share them.


:max_bytes(150000):strip_icc():format(webp)/__opt__aboutcom__coeus__resources__content_migration__serious_eats__seriouseats.com__images__20110304-kimchi-taste-test-tobagi-d374314cc1b04935a5b58bb399ba4d0f.jpg)


Recent Comments