Trader Joe’s carries a number of different kinds of chicken sausages, all of which are pretty good. The ones I especially like are the Smoked Andouille, Spicy Jalapeno and these, “Smoked Apple Chardonnay” Chicken Sausages. If you’ve never tried any of the many chicken sausages TJ’s has, these might be good to try first as they are mildly sweet with a general kind of middle of the road flavor that most people might like. I find them convenient to have on hand to get a quick dinner ready. You can use the chicken sausages in a variety of ways. You can grill, sauté or roast them. They are already fully cooked. Still for flavor I think you want to get a nice sear on them.
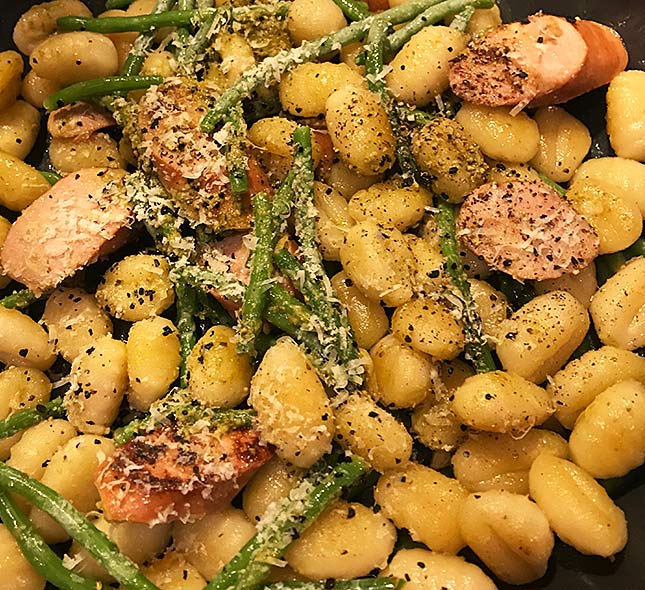
Pictured below is a dish I made using these sausages (two) of pan fried gnocchi and green beans. I just sautéed everything in olive oil with lots of garlic until lightly browned and then tossed in some French Green Beans at the end. Grate a little Parmesan on top. Easy, yummy dinner.
There are no artificial ingredients listed (no nitrates for example). Ingredients include: chicken, dehydrated apples, celery juice, onion, pepper, nutmeg, thyme, ginger, chardonnay, rosemary. The TJ Chicken Sausages come in a 12 oz package of 4 for $3.99. Trader Joe’s has a few varieties of other chicken sausage flavors too, so try them all and see which you like best. I liked this one, Roasted Garlic and Andouille….
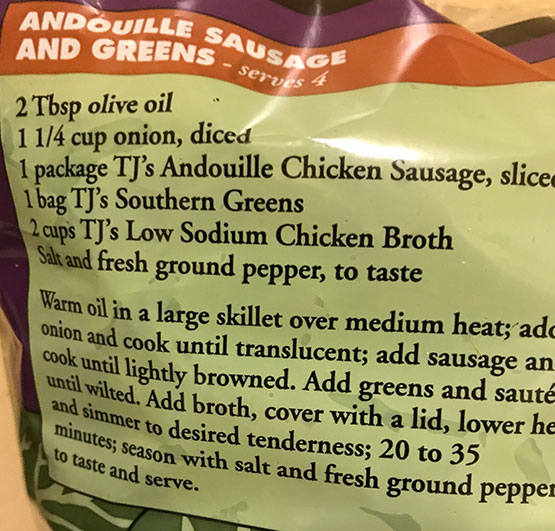
This is a recipe for the Andouille Chicken Sausage with TJ’s Southern Greens (you might use these sausages but the Andouille ones would be a bit more Southern)
INFLATION UPDATE: Prices went up; now $4.29 (Apr 2022)
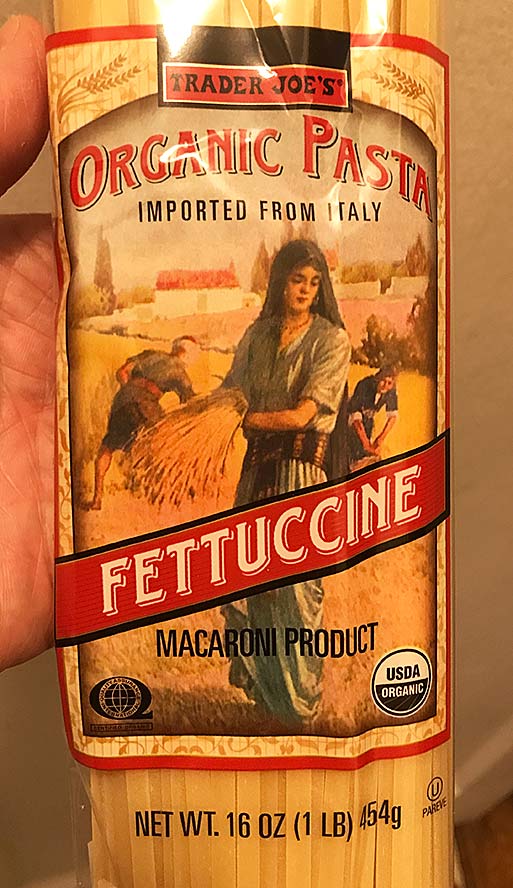
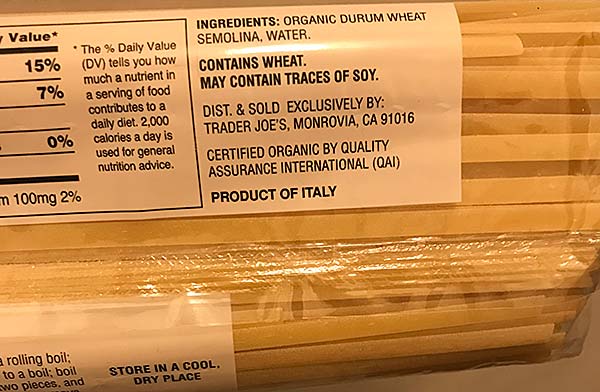
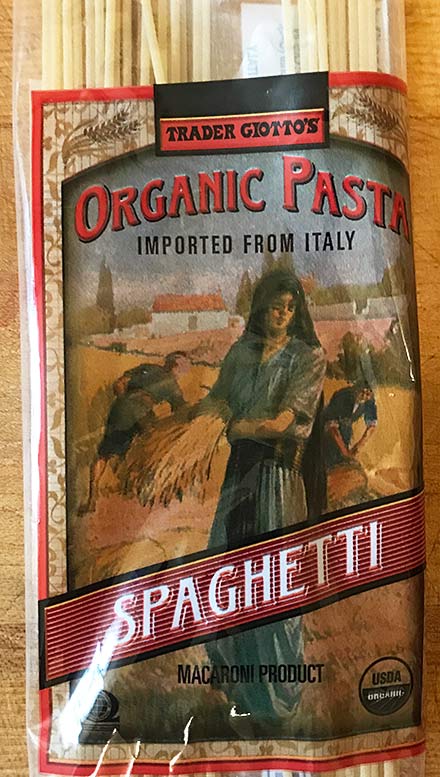
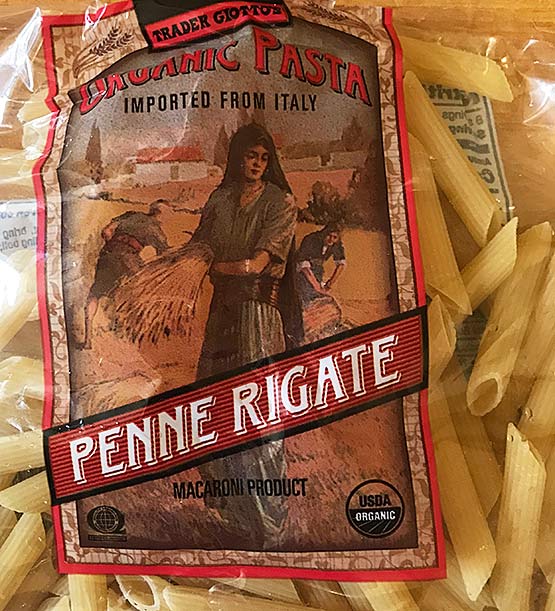
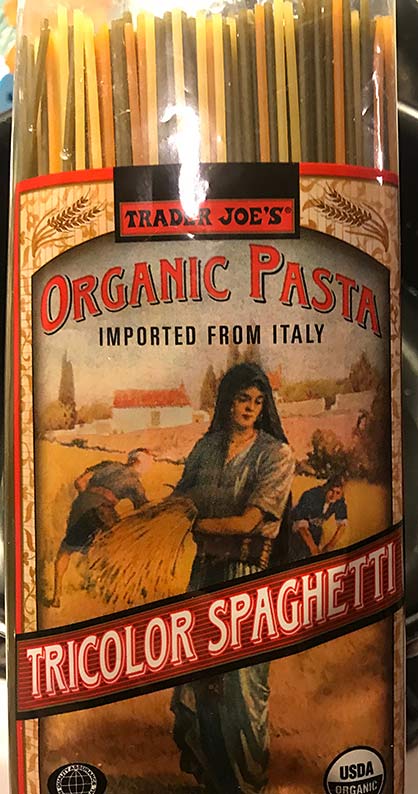
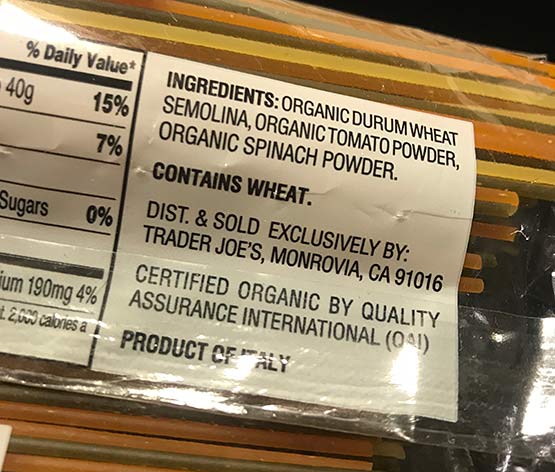
Trader Joe’s has some decent regular pastas (in the blue bags) which are a steal at 99 cents. However for a tiny bit more, you can have a better pasta being the ones labeled “ORGANIC PASTA” (with red lettering) which are a level up. If you haven’t checked them out yet, you should. These Organic Pastas cost $1.29. They are well worth the slightly higher price because you’re getting a higher quality Italian pasta. Almost “artisanal” as one can see by the rough texture, this pasta was manufactured using “bronze dies” which high quality pasta makers use. Bronze dies make better pasta as they give pasta rough edges which makes for better sauce adherence. Compare these pastas to the blue bags which are smoother. Cheaper pasta’s are extruded with Teflon dies which give them a smoother exterior. Bronze dies are expensive and wear out which is one reason why “good pasta” costs more.
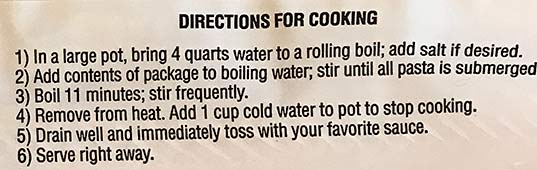
Another indication of the better quality of the TJ “Organic Pasta” the pasta is it is lighter in color, indicating a slower drying time (again, makes for better pasta). TJ’s carry a number of kinds of these organic pastas: spaghetti, fettuccine, penne, radiatore…. All good. The package directions state around 10-11 minutes of cooking time. I do a minute or two less than al dente, then finish cooking the pasta in the sauce as Italians do (they never pour sauce on bare pasta). TIP: Always save some pasta water to add in tablespoons as needed.
So check out TJ’s Organic Pastas as they make terrific dishes. Not that the regular pastas in the blue bags are bad. These just a even better. By the way, TJ’s does sell special ones labeled “Artisanal Organic” pastas. Those may cost around $3 or or less.
Any of these pasta shapes would go great of course with TJ’s CACIO E PEPE sauce – or any other favorite you like. If you want a real authentic Italian sauce, I suggest trying your hand at Pasta Puttanesca. I made it last night and it was fantastic (you can get the Capers, Olives, Anchovies at TJ’s). Watch VINCENZO make it, it’s easy and delicious!
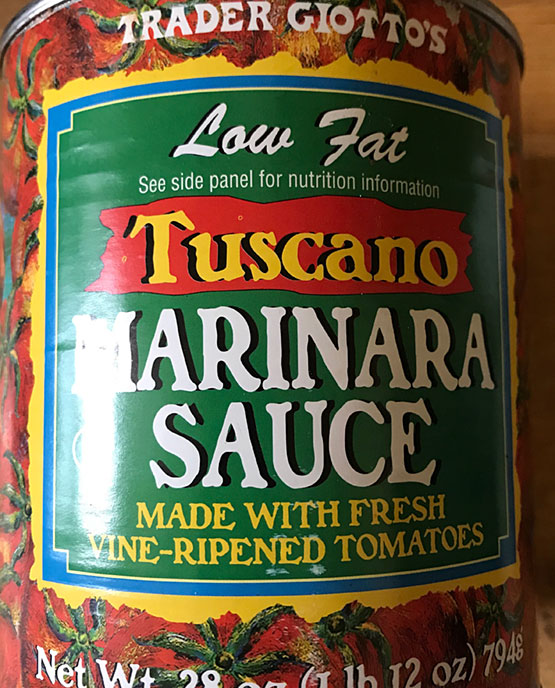
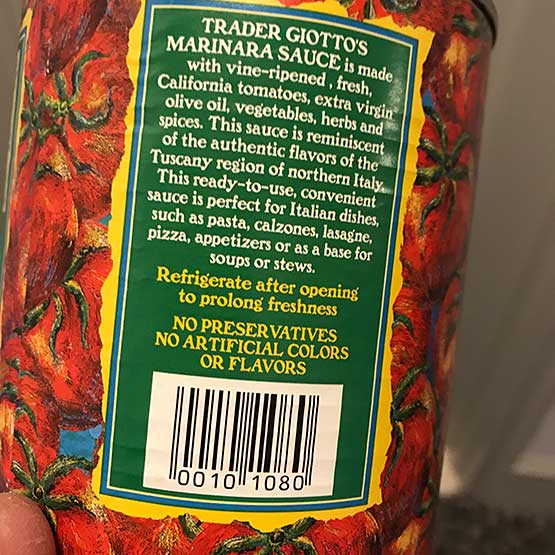
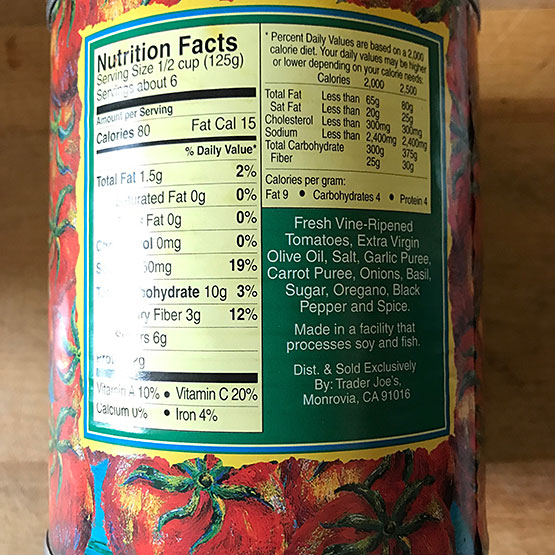
Ode to yet another discontinued Trader Joe’s product, a classic rant about an excellent TJ product, which they discontinued! Some people thought this was the best marinara sauce on the market. Many were bumbed to learn TJ’s Discontinued their favorite tomato sauce! So why am I writing about this now? Well the other day I happened to be clearing out my pantry and found I had a can of this Marinara way in the back. I opened it and tasted it and was pretty shocked to see how good it was. This marinara is, or should we say was, a terrific sauce. For one thing it’s not super smooth, it’s full of chunks of tomatoes like a homemade sauce you had put together. The current glass jars of Marinara sauce that Trader Joe’s replaced this with are smooth. I made a pasta dish using this Marinara and the dish turned out really well. I made a pizza with it a few days later which also turned out great. So yes, it’s a crime TJ’s got rid of this great and very useful sauce. Mind boggling. So just posting this Rant and sorry you won’t be able to find this really great product anymore . At least TJ’s still sells the 28 oz cans of crushed or diced tomatoes which will make you a great sauce with little effor. I always have cans of tomatoes in the pantry as well as tomato paste (can and/or tube) So if you are inclined to make your own sauce, which is not hard and I think is worth the little effort it takes. Here’s an EASY HOMEMADE MARINARA RECIPE from NatashasKitchen, link below.
TIP (1) IMO adding a tablespoon of tomato paste at the start will make it even better (2) My mom taught me useful advice: Just double up the recipe when you cook some things because for the same amount of effort you will have another meal. You can also freeze the extra batch.
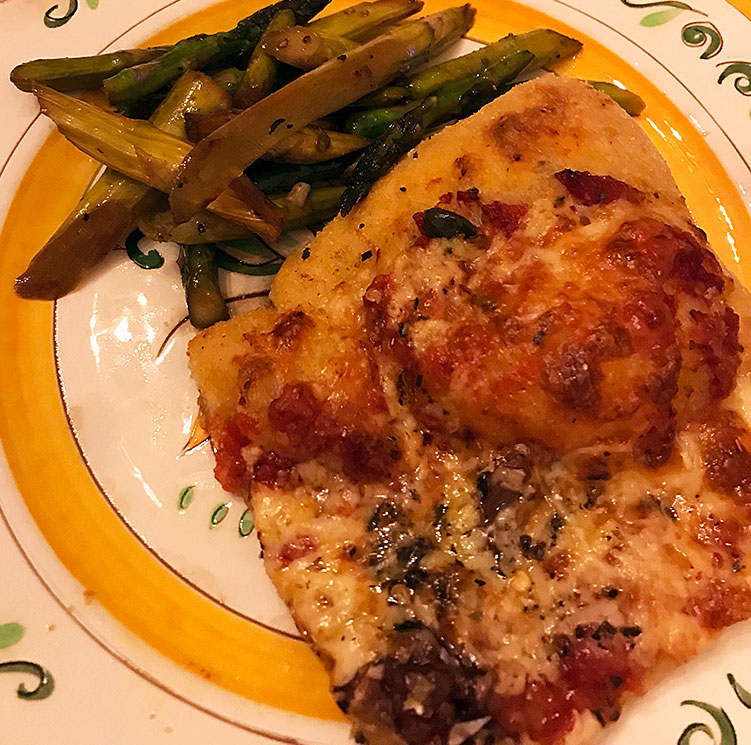
Pizza from scratch; made using this terrific marinara sauce
This is hardly a “recipe”, just putting out an idea how sometimes putting two or three TJ products together is an easy way to come up with something good. For New Year’s Eve I had the idea for a “Russian inspired” taste: Smoked Salmon with Potato Pancakes (the pancakes instead of blinis). The combo turned out just as delicious as I hoped and we really enjoyed these as a super easy special holiday meal – however you can make them any old day!
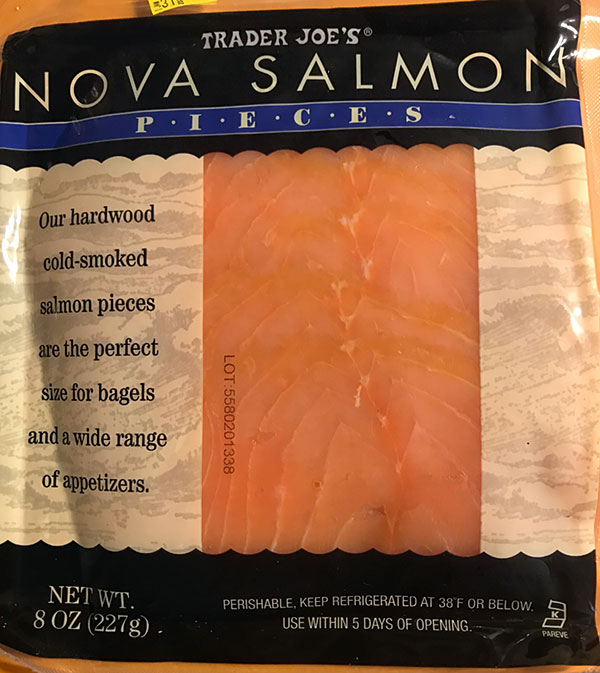
I took a package of Trader Joe’s Latkes / Potato Pancakes and Smoked Salmon and OK instead of sour cream I actually used Greek yogurt to save a few calories. Of course a Russian would use lots of Sour Cream, calories be damned, plus fresh dill. To put the dish together all I had to do to was cook the frozen Potato Pancakes till crispy in an frying pan, then topped them with a good amount of smoked salmon and topped that with a spoon of Greek yogurt. Better with sour cream sure, up to you. Sprinkle some fresh dill on if possible plus a few drops of fresh lemon juice. Voila, it took about 5 minutes until they were ready to serve as a dinner with salad and roasted beets on the side. Easy as pie to “make” and really yummy, so try this if it sounds good to you. You could make this as an appetizer for a few guests in minutes and make a big splash with almost no work except assembling the ingredients. Now I was hardly the only one shopping thinking about Smoked Salmon early afternoon of New Years Eve. Trade Joe’s whole section with smoked salmon was completely sold out except for a few packs of this Nova Salmon! The Nova was a wee bit saltier than some other versions they sell, but as fine with the creamy sour cream / yogurt as it it all balanced out. The next time I make these I will probably opt for the Everything Salmon.
Trader Joe’s (frozen) Potato Pancakes Latkes are $2.69 for 10 little pancakes. I think the Nova was about $9 for 8 oz package.
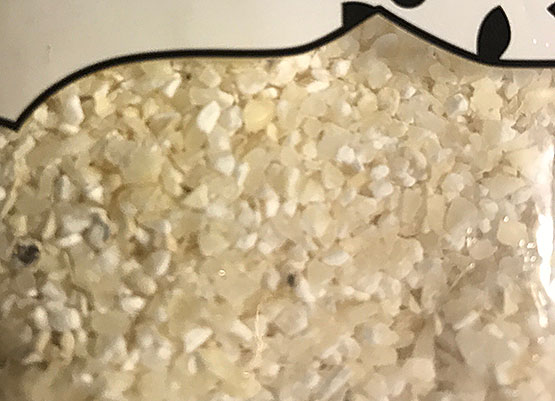
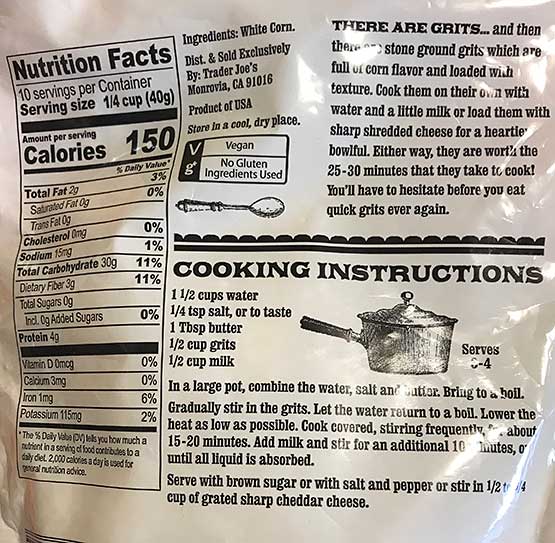
“There are grits and then there are stone ground grits.”
Up here in the Yankee North of NYC, most of us are probably not as familiar with grits as folks in the South are. I tried these Trader Joe’s Stone Ground Grits and guess what? This damn Yankee loves me some Grits! Maybe its not such a surprise as I have always enjoyed and made Italian Polenta, and let’s face it grits are almost the American version of polenta, right? OK not exactly as grits use a different kind of corn.
Anyway these TJ’s stone ground grits are much better than commercially mass produced grits you see at the supermarket kind which are not stone ground. Stone Ground Grits are milled from the whole kernel of corn including the healthy tasty germ. They have a coarse, varied texture, as you can see in the picture and have more corn flavor than the supermarket kind. Think of these as “gourmet grits”. Grits take about 25-30 minutes to cook, stirring them every 5 minutes or so. You can just follow the recipe on the package and you will get good grits. I like to cook them using more milk (half milk/half water) which makes them even creamier. Shredded cheddar cheese at the end makes them even better if you like them savory (Unexpected Cheddar perhaps!? Oh yeah). I like to use grits as the Base for a dish, such as the base for sautéed GREENS or especially the base for SHRIMP AND GRITS, which is terrific and typically Southern. You can even do it a super simple version of Shrimp and Grits: just grill up some red shrimp with lots of seasoning and serve them on top of cheesy grits with the pan juices. Yum!
Cook grits low and slow in a thick bottomed pan and stir them often so the bottom doesn’t burn. They may be even better with another 10-15 mins of cooking (ie 40-45 minutes total). If they get too thick, just add a little more water. TJ’s Stone Ground Grits are $2.29. Grits are GLUTEN FREE of course.
TIP: Double up the recipe when you make some grits; then you have leftovers which you can use to make pan fried grits, kind of the way you might make pan fried polenta, which I just love.
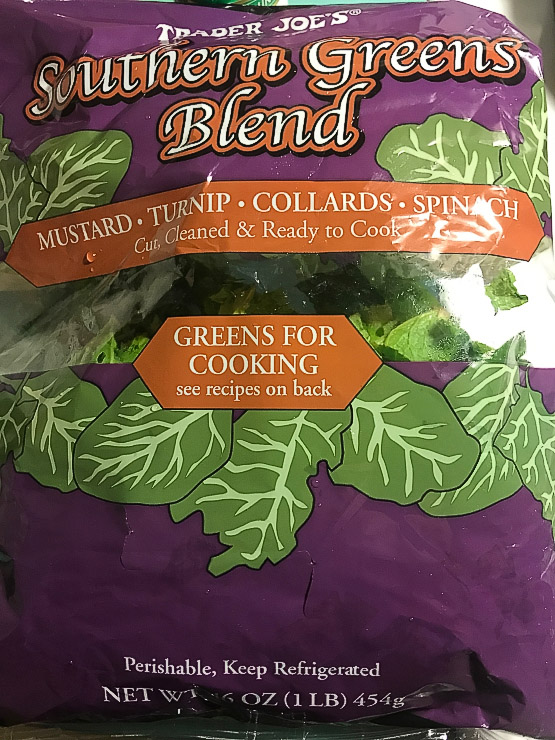
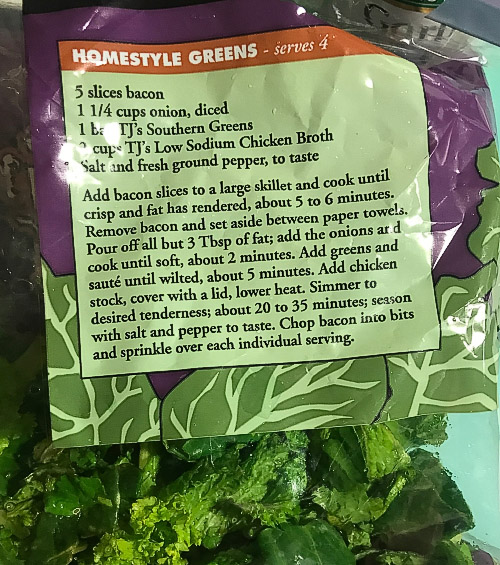
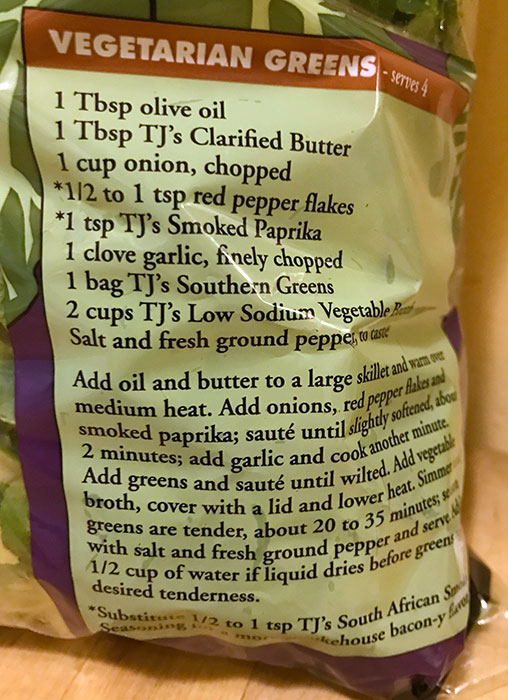
Trader Joe’s “Southern Greens Blend” Greens For Cooking” Cut, cleaned and Ready To Cook.
I think this is a fairly new product at TJ’s or at least I don’t recall seeing it until recently. It’s good. No, make that terrific. This Yankee boy is really digging on these Southern Greens. TJ’s Southern Greens contains a blend of greens typical in Southern cooking, specifically Mustard, Turnip, Collards and Spinach, prepped and ready to cook with. Similar to TJ’s bags of prepped kale but these are different/better with a little funky spicy, slightly bitter taste I love. There are a few recipes on the back which will give you some ideas. These greens take anywhere from about 10-30 minutes to cook depending on how cooked you like your greens. Now of course you don’t need a use a “recipe”. You could just sauté the greens in some olive oil with some chopped garlic, covered on low-med heat with a touch of liquid (stock or water), season to taste with salt and pepper and cook them for 10-30 minutes to your desired degree of greens “done-ness”. They start bright green and get darker and softer as they cook down. Taste them along the way and see how you like them best. TIP: If you find them a little too bitter for your palate you can toss in a tiny amount of sugar to taste. I don’t! I love the little bitterness from the mustard greens. Frankly I am finding myself throwing some of these greens now into whatever I’m cooking. I recently mixed some raw greens into a pot of Jasmine rice as I was cooking it and that worked really well (cook time was about 16 minutes total). I’m throwing some greens into many things I’m cooking to “green up” the dish.
GREENS IS GOOD! They are HEALTHY, and good for y’all ! Eat more dark green leafy vegetables easily using these Southern Greens. They are $2.99 a 1 lb bag. One thing, use it up pretty fast; cut leafy greens start to go bad fairly quickly; so use it in about 3 days. TIP: I poke a bunch of holes (tip of sharp knife) in bags of greens to let in a little air so they don’t rot quite as fast. These greens need to be used pretty fast before they go bad (3-4 days?)
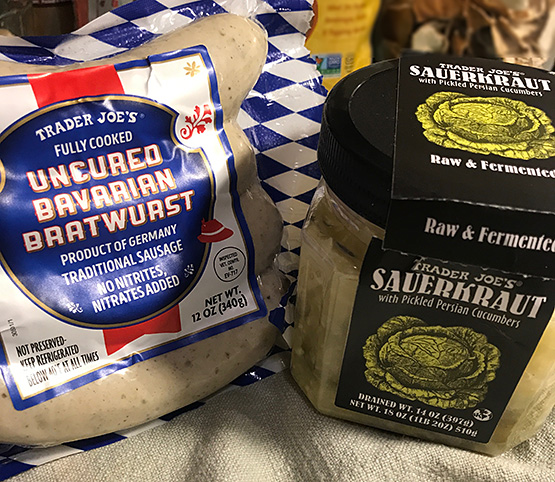
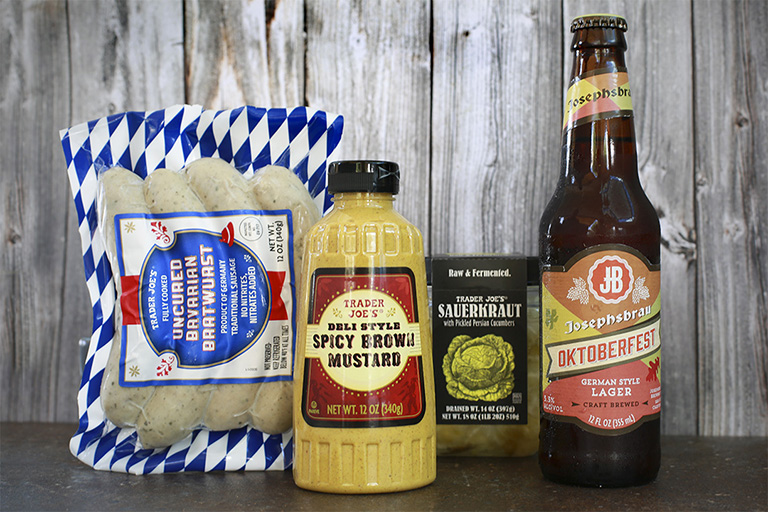
The combination of TJ’s Uncured Bratwurst with their natural Sauerkraut is pretty much a no-brainer.
Maybe the only question is whether you warm up the sauerkraut with your bratwurst – or just serve it on the side, cool, so its crunchier. You can make an easy and terrific lunch or dinner if you team up these made for each other items with a few more TJ items…. put the Bratwurst on some bread (BRIOCHE?) or TJ’s Brioche Hot Dog Buns. The mustard of your choice (Dijon with mustard seeds or Spicy Brown?).
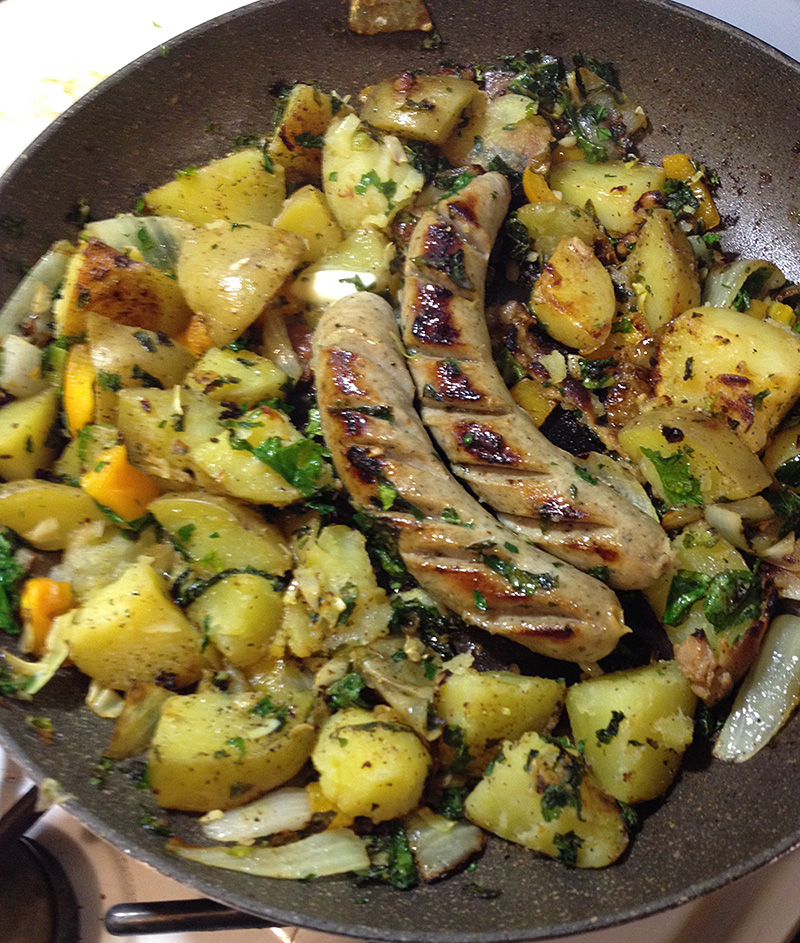
Here I went with sautéed potatoes cooked up with the Bratwurst and sauerkraut on the side. These all made for a super dinner combo.
RECIPE: Sauteed Pan fried Potatoes – Cut up a few Yukon Golds into cubes and par-boil them 5 minutes or so in salted water. Add the drained potatoes to a nonstick pan with oil and butter and toss in a sliced onion. Cook for 15-20 minutes on medium heat stirring occasionally until the potatoes are done and golden brown. Make room in the pan, and add your bratwurst around the 10 minute mark and cook on both sides until browned. You can put shallow slashes to score them before cooking which will open up as they cook. Garnish with chopped parsley or arugula for color. Serve with sauerkraut and mustard. Serving Options: beer and bread (brioche hot dog buns or chewy sourdough)
(Norway, Farm Raised, Skin On, Boneless, Medium Firm Texture, Mild Flavor)
Each 1 lb bag has 4 (4 oz) pieces of fish inside. Norwegian farm raised, Atlantic salmon, perfectly flash frozen. You will get mostly center cut portions plus a tail portion usually. So first things first, DEFROSTING: The best method to defrost anything is an overnight thaw in the fridge. So best to take out the portion(s) you want the night before and put in a covered container. I did that last night and while it was not completely defrosted, it was mostly defrosted so I just left the salmon out for another hour on the counter.
If you didn’t take it out the night before, in a pinch you can do the quick thaw method as described on the package (bagged, in cold water 30 minutes) . Obviously if you are not using the whole thing, just seal the package back up with the nice built-in zip lock and try to squeeze out excess air.
COOKING : (Grill, bake, boil or pan fry)
I like pan frying and broiling the best. Brining? I tried the quick brine technique of giving the defrosted salmon fillets a 30 minute soak in a brine. I liked the results (see link below for full info at The Kitchn)
But if you don’t have time for brining, don’t worry it will still taste great.
After drying off the salmon, I gave it seasoning on both sides with a nice sprinkle of AJIKA which will give great color as well as flavor (in my case as it was brined, I added no more salt). I cooked the fillets using the pan fry method in a cast iron pan (or use a non stick pan) in a mix of oil and butter for about 5 minutes on the skin side first till the skin looked crispy. Flipped them, then cooked about 2 minutes on the second side which needs less time than the first. Personally I hate overcooked fish. Cook fish just till it’s no longer translucent and flakes easily with a fork. You can always put it back for 30 seconds if it needs it. You don’t want to dry it out especially as farmed salmon has less fat.
Other cooking methods would be broiling or grilling or baking. Or I imagine cooking in an air fryer.
SAUCE: If you want to serve with a sauce, TJ’s tzaziki sauce will be great with salmon. Or Greek yogurt mixed with lemon juice, or tartar sauce. Even simple lemon juice and butter is great. Fresh dill is wonderful with salmon. This time I plated the salmon up with some lemon butter, and served it with a side of TJ’sHarvest Grain Blend (shown) which is perfect with this. The salmon was tasty, if a bit mild of course as this is farmed. Wild salmon, which I love is usually about double the price of this. Trader Joe’s sells this for $8.99 for a 1 lb package (a bit little over $2 a portion). For the price I think this salmon is very tasty and a good value. I find Trader Joe’s version, superior to Costco’s version. So giving this a thumb’s up for value and quality. INGREDIENTS: Atlantic Salmon (no added salt) Protein = 23 grams! EAT FISH
(note: price has increased)
Overnight thaw: Remove fish from packaging and place on a try (or covered container) Leave overnight in fridge
Quick Thaw: Place fish in a sealed bag in a big pot of cold water until defrosted (which may take up to 1 hr).
DO NOT microwave fish to defrost: it will give a very mushy texture and ruin the fish
Don’t feel like cooking but want to eat salmon? Check out Trader Joe’s LIGHTLY SMOKED SALMON . Gourmet quality hunk of salmon, just open the can. Probably the best salmon you ever got canned.
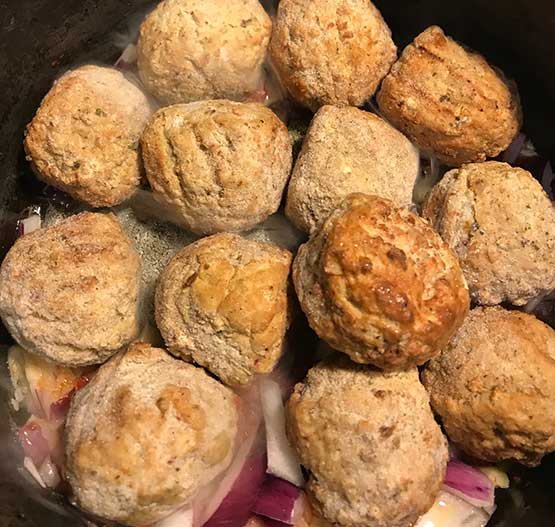
Trader Griotto’s (frozen)Flame Broiled Italian Style Fully Cooked Meatballs
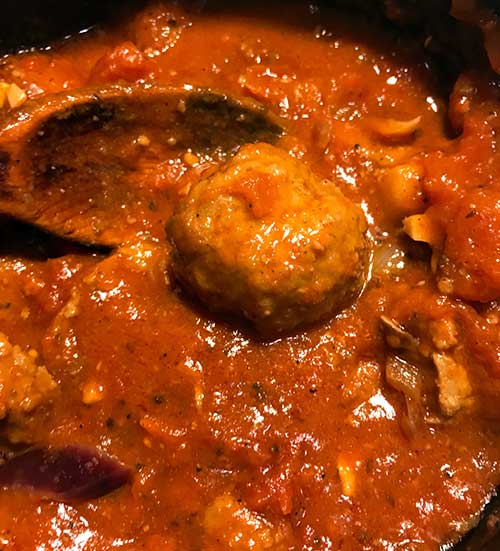
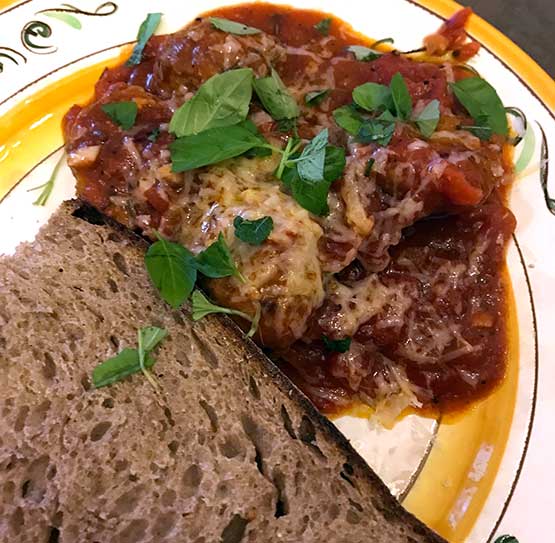
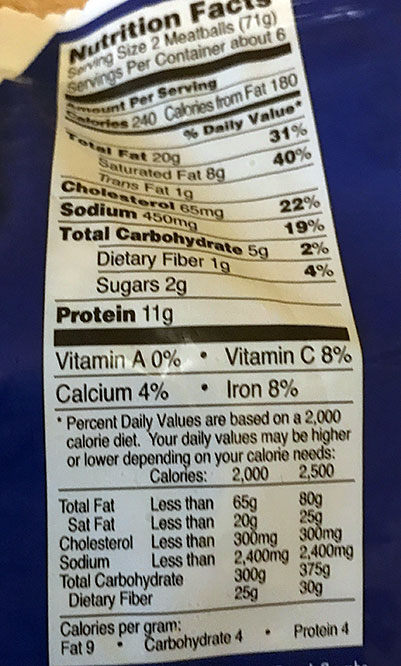
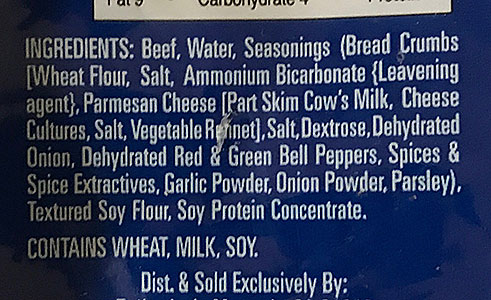
First, let us be realistic. Are these Trader Joe’s frozen meatballs anywhere as good as my own homemade ones (which in all modesty are pretty good?) Of course not. However, making meatballs is kind of a lot of work. So I wanted to try these Trader Joe’s all beef “Meatballs Italian Style” to see if they are any good. We did enjoy actually them with my own tomato sauce for a pretty easy dinner. So these might be worth giving them a try to see what you think. The dish I made with these turned out tasty. I made an easy quick sauce: olive oil, garlic, onion, tablespoon of tomato paste, can of diced tomatoes, grated pecorino cheese and basil – a recipe is below). Of course you can just use a bottle of sauce you lazy bones, that’s fine. I put the meatballs in the sauce and simmered them for 30 minutes to hopefully get them flavored with the sauce. They turned out pretty well, my main complaint being they had a slightly rubbery texture. Honestly I don’t know if they always do or it was my fault defrosting them (or not). I would usually thaw something like this in the fridge overnight as I always recommend, but this was a last minute dinner idea and I thought maybe I could just put the frozen meatballs into the sauce and slowly defrost them on low in the sauce (which the package does kind of say). Is that why they came out a bit rubbery? Next time I’ll defrost them slowly and see. Anyway I served the meatballs and sauce and some of TJ’s fantastic Country Loaf bread I had found. We did kind of a “meatball sub” with these which was actually pretty tasty. A few night’s later, I made Ziti with the leftover meatballs & sauce – also tasty. So my take is these are worth giving a try, either with your own sauce or your favorite TJ’s sauce. I do suggest doing a proper defrost (thaw in fridge night before). Also I will brown up the thawed meatballs even more in olive oil before adding to sauce. Browning meat gives lots of flavor. I recommend you simmer these in sauce for at least a 1/2 hour to absorb flavors. These ITALIAN MEATBALLS were about $4.50 for a 1 lb bag. FYI , TJ sells other versions, one made with Turkey and one Meatless, all of which you will find in the frozen section near these.
FAST EASY TOMATO SAUCE and MEATBALLS: Take 2 tablespoons of tomato paste and sauté that in a few tablespoons of olive oil for 30-60 seconds. Add a good amount of sliced garlic and a little diced onion and cook 5 minutes on low stirring occasionally till onions are translucent. Add a can (or two) of Diced Tomato, rinsing out the can with a little water (or wine) to get it all. Simmer on low 45 minutes, with the thawed and browned meatballs. Add Italian Seasoning to taste. Optionally add capers, and some Bomba. When serving, add grated Parmesan, Pecorino, Asiago or Grana and if you have some fresh basil, lovely. Serve with either pasta, gnocchi, or warm fresh Italian bread for a meatball hero.
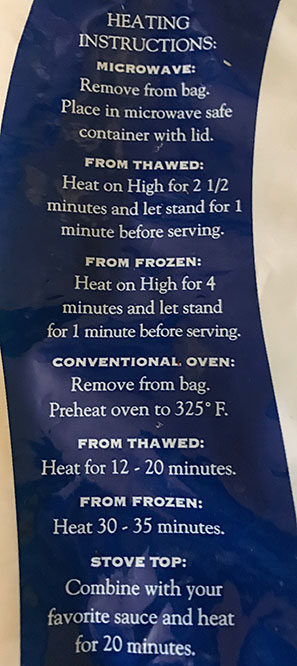
Despite all these options they list I think the best one would be the thaw in fridge (1/2 day?)
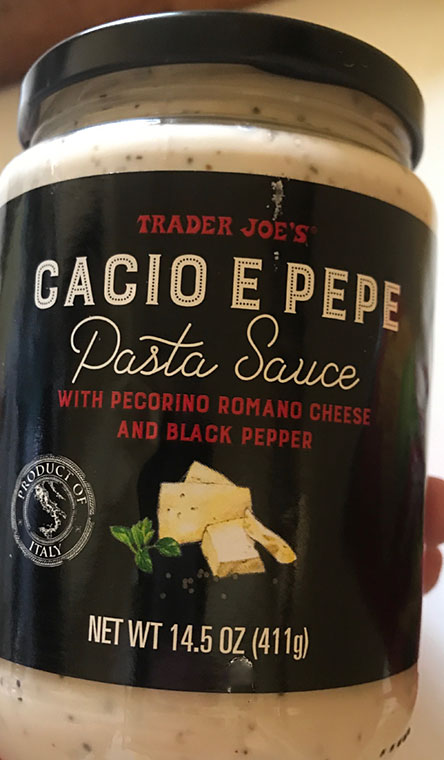
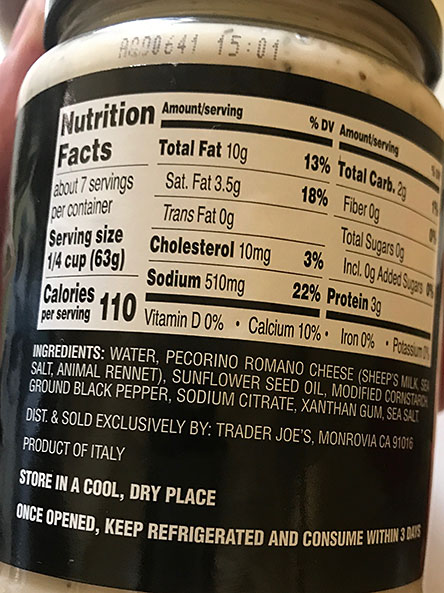
“A creamy, cheesy pasta sauce made wth Pecorino Romano and Black Pepper”
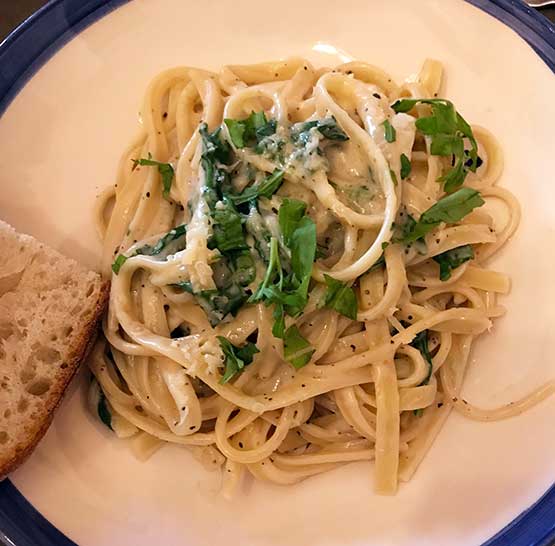
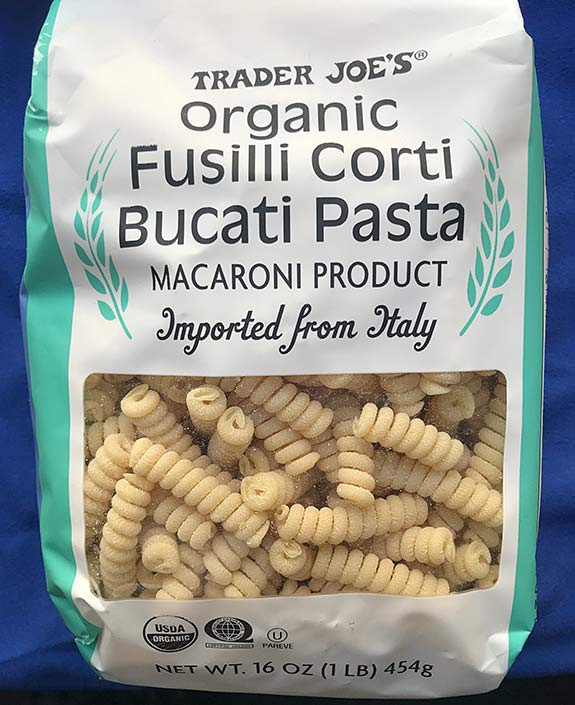
Cacio e Pepe means “cheese and pepper” and is a classic Roman pasta. Trader Joe’s Cacio e Pepe Pasta Sauce has been getting a lot of buzz since they released it, so I had to give it a try. You know what? It is pretty good. The fettucine cacio e pepe dish I made with this sauce turned out really tasty. Making a dish with this could not be easier, just combine this sauce with your cooked pasta. That does not mean just dump a ladle of sauce on top of the pasta though. Americans seem to serve pasta like this, which makes Italians cringe. Italians always finish cooking pasta with the sauce together for the last minute or so to blend the flavors. As it comes right out of the jar TJ’s C&P sauce is really, really thick. A few big spoons go a long way. So would not even think of using say the whole jar to make just 2 portions – or even 4. The Nutrition label suggests this 14.5 oz jar “makes 7 servings” so you use that as a rough guide, but let’s round it out and say a jar will make about 6 portions. My basic suggestion is try maybe 2 or 3 heaping Tablespoons of sauce per portion of pasta, which you will thin later with a little pasta cooking water to get the consistency you like to coat the pasta but not drown it in sauce, Italian style. Italians never drown pasta so it’s swimming in sauce, it’s coated generously, in just the right proportions of sauce to pasta. Italians also finish cooking pasta, with some sauce and never just pour it over naked pasta. TIP: Try making this with any of TJ’s excellent Artisan Organic Pasta varieties(spaghetti, fettuccine, etc) Of course any shaped pasta such as Ziti or Farfalle will work well with this type of creamy sauce too. You could even do a pan fried Gnocchi perhaps with this sauce. TJ’s made the sauce “bulletproof” with the addition of cornstarch which prevents separation. Sure they are saving on some of the ingredients for example using sunflower oil and not olive oil. Don’t worry you will fix that when you plate it with some Good Stuff.
Be sure to have a piece of Pecorino cheese, as well as fresh black peppercorns (grinder) on hand. These few additions will help make this jarred sauce taste way better. Have a pan big enought to hold the pasta ready with your C&C sauce in it. Boil the pasta, and drain it when it’s about a minute UNDER al dente (save 3/4 cup pasta water). Finish cooking the pasta with the C+C sauce for one minute or until the pasta is cooked perfectly al dente. While you are tossing it to coat, add pasta water a few tablespoons at a time as needed, mixing it all up with tongs to incorporate pasta and sauce until you get your desired consistency fully coating pasta generously but not swimming with a lot of extra liquid. Plate it on warm dishes and quickly add a few touches. Some freshly grated Pecorino, a few grinds of black or rainbow pepper, and a drizzle of good EVOO. I topped it with a wee bit of chopped arugula for color. I know a Roman would protest that or any addition to the 2 basic cacio and pepe ingredients of cheese and pepper. If you wanted to use a little grated Parmigiano or Grana Padano, they will be delicious but again don’t tell your Roman friend who will so “only Pecorino Romano is allowed” on Cacio e Pepe! It says on the jar, that once opened, use it within 3 days. I didn’t want to have it again so soon so I figured I would simply put the jar (carefully ) in the freezer. The following week I did an overnight defrost in the fridge which worked fine keeping this sauce intact and I then made another meal with the remainder.
As far as what shape and kind of pasta to use with this sauce TJ’s has so many good ones including the ORGANIC and ARTISANAL pastas. You pretty much can’t go wrong with any of your favorite pastas.
Now you can even use this sauce for other things besides pasta. You could use it on vegetables (perhaps roasted brussel sprouts, or potatoes, or on top of asparagus?) Or with eggs, on top or even mixed into some scrambled eggs or on an omelette….
A 14.5 oz jar of TJ’s Cacio e Pepe sauce costs $3.49.
So while this sauce is handy I am all for making a real Cacio e Pepe from scratch once in a while. Cacio E Pepe is only two ingredients and that’s where the magic happens getting it to emulsify (and not become gloppy). You may have to make it a few times to get the hang of it but once you do, you will really get a great deal of pleasure from making it yourself no doubt. I liked this guy’s take on making it (tip: don’t use very hot water to mix with the grated cheese to make the emulsion and don’t let the cheese boil, just get it warmed up so it doesn’t break) A teaspoon of cornstarch slurry makes this foolproof BTW., and in fact the Trader Joe Cacio e Pepe sauce has cornstarch in it to make it bulletproof as well. If you get into Cacio E Pepe and want to try to make the sauce yourself yourself, watch these two pro’s, absorb some of their ideas and I bet you will end up with a terrific authentic Cacio e Pepe. Buon Appetito!


Recent Comments